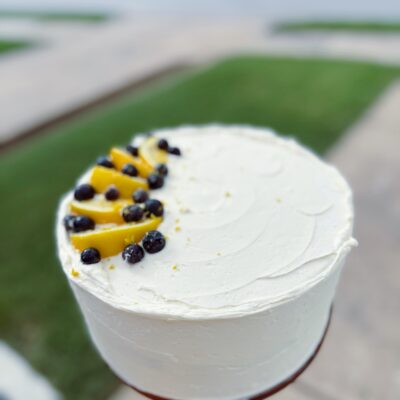
Delicious Gluten Free Blueberry Cake + Lemon Frosting
This Gluten Free Blueberry Cake is the perfect balance of tender, moist crumb and bursts of juicy blueberries in every slice. Made with a carefully blended mix of gluten free flour, potato starch, and sour cream, it bakes up soft and fluffy without anyone ever guessing it’s gluten free. The fresh blueberries bring a natural sweetness and pop of color, while the simple vanilla base makes it versatile enough to pair with cream cheese frosting, lemon glaze, or just a dusting of powdered sugar. Whether you’re baking for a birthday, brunch, or simply to enjoy with your morning coffee, this cake is a showstopper that’s as beautiful as it is delicious.This recipe makes a 3 layer 8" or 9" cake!
Ingredients
For the Cake
- 2 1/4 cups granulated sugar
- 15 tablespoons unsalted butter softened
- 1 1/2 cups sour cream
- 1/2 cup milk use whole milk for best texture or substitute with a dairy-free milk if needed.
- 2 large eggs room temperature
- 6 large egg whites room temperature
- 3 teaspoons pure vanilla extract
- 3 cups gluten free all-purpose flour blend – choose one that already contains xanthan gum or guar gum if you prefer to omit the added binder. I prefer Arrowhead Mills but Bob's Red Mill works well too!
- 9 tablespoons potato starch
- 1 tablespoon guar gum omit if your flour blend already includes xanthan gum or guar gum.
- 1 tablespoon baking powder
- 3/4 teaspoon baking soda
- 1 teaspoon salt
- 2 cups fresh blueberries rinse and pat dry before folding in; toss lightly with 1 tablespoon of the flour mixture to help prevent sinking during baking.
For the Frosting
- 3 sticks salted butter softened to room temperature (some will say ONLY unsalted butter, but I always use salted and it’s my personal preferance!)
- 1 1/2 pounds about 7 cups powdered sugar (confectioner’s sugar), sifted
- 1/4 cup freshly squeezed lemon juice from about 2 lemons
- 1-2 tablespoons heavy whipping cream adjust for consistency
- 1-2 teaspoons vanilla extract
- Optional: zest from 1 lemon for added brightness
Instructions
For the Cake
- Grease the sides of each three 8-inch or 9-inch round cake pan with butter or nonstick spray.
- Line the bottoms with parchment paper rounds to prevent sticking and ensure clean removal after baking.
- Heat your oven to 350°F (175°C) so it’s ready when the batter is done.
- In the bowl of a stand mixer fitted with the paddle attachment, beat the softened butter and granulated sugar together on medium speed until light, fluffy, and pale in color, about 3–5 minutes.
- Stop halfway through to scrape down the sides and bottom of the bowl so everything mixes evenly.
- In a medium mixing bowl, whisk together the eggs, egg whites, sour cream, milk, and vanilla extract until smooth and well combined.
- In another medium bowl, whisk together the gluten free flour blend, potato starch, guar gum (if using), baking powder, baking soda, and salt.
- This helps prevent clumps and ensures the leavening agents are evenly distributed.
- Reduce the stand mixer speed to medium-low.
- Add the dry and wet ingredients alternately to the butter-sugar mixture: begin with 1/3 of the wet, then 1/3 of the dry, repeating until all is incorporated, and ending with the wet mixture.
- Mix only until just combined; do not overmix or the cake may become dense. The batter will be thick but smooth.
- Gently toss the blueberries with 1 tablespoon of the dry flour mixture to coat them lightly (this prevents them from sinking).
- Fold the blueberries into the batter with a spatula until evenly distributed.
- Divide the batter evenly among the prepared cake pans. Use an offset spatula or the back of a spoon to spread the batter into an even layer and smooth the tops.
- Bake for 15 minutes, rotate the pans for even baking, then continue baking for another 15–20 minutes.
- The cakes are done when the tops are golden brown and a toothpick inserted into the center comes out with only a few moist crumbs (no wet batter).
- Remove pans from the oven and allow cakes to cool in the pans for about 15 minutes.
- Run a thin knife around the edges if needed, then carefully invert the cakes onto wire racks.
- Peel off parchment paper and allow the cakes to cool completely before frosting.
For the Buttercream
- In the bowl of a standing mixer fitted with the paddle attachment, beat the softened butter on medium speed for 2–3 minutes until it is light, creamy, and pale in color. This step helps develop a fluffy texture. You could also use an electric mixer / hand mixer and a large bowl.
- Reduce mixer speed to low. Slowly add the sifted powdered sugar, 1 cup at a time, mixing after each addition. Scrape down the sides of the bowl as needed to ensure even mixing. Once all sugar is incorporated, beat on medium speed for 1 minute to fluff it up.
- With the mixer on low, add the lemon juice and vanilla extract. Increase to medium speed and beat for 1–2 minutes until fully incorporated. The frosting should become slightly looser and take on a bright, citrusy aroma.
- Add 1 tablespoon of heavy whipping cream and beat again on medium-high speed for 3-5 minutes. If the frosting seems too thick, add the second tablespoon of cream. If it’s too loose, add a little more sifted powdered sugar. Beat until smooth and airy.
- Optional lemon zest: For a more intense lemon flavor and beautiful speckled look, fold in the zest of one lemon using a spatula.
For Assembly
- To layer cake, place the first cake layer top side up, in the center of the cake board. Spread buttercream atop, then pipe a rim of the buttercream around the edge of the cake and fill the center with lemon curd.
- Place the second cake layer on top of the buttercream and filling, bottom side down. Repeat piping and filling.
- Place final cake layer, top side down (flip it so the flat bottom is facing up).
- Place straws or popsicle sticks into the center of the cakes and three additional ones around the center, about 2 inches out.
- Crumb coat the entire cake with a thin, even layer of the buttercream, covering the sides of the cake and the top of the cake in buttercream. Pop it into the freezer for about 10 to 15 minutes to set this layer of frosting.
- Once the crumb coat is set, continue to frost the cake with the remaining frosting. I like to use a cake edger or scraper, but you don’t have to use this. You can always create a rustic look with a spatula.
- Decorate the top of the cake however your heart desires!