Festive, Gluten Free, Candy Cane Sugar Cookie Recipe
These gluten-free candy cane cookies are sugar cookie perfection, with a light texture and a delightful touch of peppermint. And the adorable candy cane design is ultimate nostalgia, and sure to create memories for many years to come!
I had never heard of these cookies until I married into the Holm Family. But, ya’ll, they are a BIG deal. It was a tradition they shared with their mama, and one they each want to share and pass onto their own littles. I can imagine clearly, these five blonde headed farm babies helping their mama make these cookies, in their farm house kitchen, with snow falling outside in the North Dakota winds. It connects me to bits of Corey’s childhood, which I love.
So I adjusted two things: I added an egg to act as a binder, and I refrigerated before rolling out and before baking. Wyatt loved helping with these this year. It was hilarious. He preferred making “powerful night crawlers” AKA worms. LOL. Life with boys! I hope you and your littles enjoy making these Holm treasures! Read on for all the details to making these yummy holiday cookies!

Why You Will Love This Recipe:
- Perfect cookie for the holiday season!
- A recipe the kiddos will love making!
- A tradition in the making!
- Simple ingredients that you probably have on hand already!
- Gluten-Free and Artificial Dye-Free
- They are better when you get help from the kiddos (the misshapen cookies with excessive sprinkles is a sight I will miss some day)
- Great for a cookie exchange!
Ingredients:
- Butter : Use unsalted butter to control the saltiness of your cookies. Ensure it’s softened for easy creaming with sugar.
- Powdered Sugar : Creates a smooth and tender texture. Be sure to sift to avoid lumps.
- Egg : Acts as a binder and adds richness to the dough.
- Vanilla Extract : Adds warmth and enhances the overall flavor of the cookies. Use pure vanilla extract for the best results.
- Peppermint Extract : Provides the signature candy cane flavor. A little goes a long way, so don’t overdo it.
- Gluten-Free Flour : I recommend Arrowhead Mills Gluten-Free 1-to-1 Baking Flour for consistent results. This flour blend already includes xanthan gum for structure. Bob’s Red Mill Gluten Free Flour would also work well here!
- Red Food Coloring OR Natural Red Food Dye: I prefer using natural food color like Supernatural (THE best). If you use another natural food dye brand, your red may be more of a vintage pink. Adjust the amount to achieve your desired intensity.
Instructions:
- Prepare the Dough Base
In the bowl of a stand mixer fitted with the paddle attachment, combine the softened butter and powdered sugar. Beat on medium-high speed for 3-4 minutes, or until the mixture is light, fluffy, and pale in color. - Incorporate Wet Ingredients
Add the egg, vanilla extract, and peppermint extract to the butter-sugar mixture. Mix on medium speed until fully combined, scraping down the sides of the bowl as needed. - Add Dry Ingredients
Gradually add the gluten-free flour, one cup at a time, mixing on low speed after each addition. Scrape down the sides of the bowl occasionally to ensure the flour is fully incorporated. The dough should come together and form a smooth consistency. - Divide and Color the Dough
Remove half of dough from the mixer and shape it into a disc. Wrap it tightly in plastic wrap and refrigerate. To the remaining dough still in the mixer, add a few drops of natural red coloring. Mix on low speed until the color is evenly distributed, adding more drops as needed to reach your desired red hue. Wrap the red dough in plastic wrap as well. Refrigerate both pieces of dough for at least 1 hour, or up to 3 days. - Preheat Oven and Prepare Baking Sheets
Line baking sheets with parchment paper or silicone baking mats. Preheat your oven to 375°F (190°C). - Shape the Candy Canes
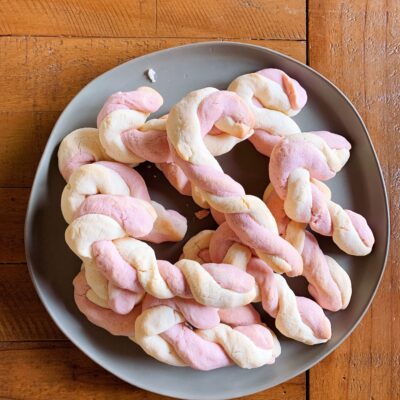
Line cookie sheets with parchment paper. Remove the dough from the refrigerator. Use a spoon or small cookie scoop to portion out equal amounts of the white dough and red dough, approximately the size of a walnut (about 1 tablespoon each). Roll each portion into a snake shape about 6 inches long. Gently twist one white piece and one red snake together to create the candy cane pattern and candy cane shape. Curve the top to form the hook of the candy cane and place on the prepared baking sheet. Repeat with the remaining dough. OPTIONAL: top with your favorite sprinkles (again – LOVE Supernatural) or sprinkle crushed peppermint candy on top of the cookies. Make sure to space out the candy cane pieces so they don’t touch during baking. - Chill Time Before Baking (optional)
Once all the candy canes are shaped and arranged on the baking sheets, refrigerate them for 15 minutes. This step helps the cookies hold their shape while baking. - Bake the Cookies
Bake the cookies in the preheated oven for 8-10 minutes, or until the edges are just set and slightly golden. Avoid overbaking to keep the cookies soft. - Cool Completely
Remove the baking sheets from the oven and let cool 3 minutes before carefully sliding the parchment paper with the cookies onto a countertop or cooling rack. Let the cookies cool completely before attempting to move them, as they will be delicate when warm. - Your candy cane sugar cookies are now ready to serve! Serve on your favorite Christmas cookie trays! Store them in an airtight container at room temperature for up to a week. For longer storage, freeze in a single layer, then transfer to a freezer-safe container.
Perfect Pairings:
Here are some perfect pairings to complement the festive flavors of gluten-free candy cane cookies:
Beverages
- Hot Chocolate: Top with whipped cream or marshmallows and sprinkle crushed peppermint for a cohesive flavor.
- Peppermint Mocha: The coffee and chocolate notes enhance the peppermint in the cookies.
- Chai Tea Latte: The warm spices create a cozy contrast to the cool peppermint flavor.
- Milk Alternatives: Serve with almond or oat milk for a creamy, dairy-free option.
- Mulled Apple Cider: The spiced sweetness pairs nicely with the minty freshness of the cookies.
Dessert Pairings
- Vanilla or Peppermint Ice Cream: Serve the cookies alongside a scoop for a holiday-inspired dessert.
- Gluten-Free Brownies: Layer a cookie on top of a gooey brownie for a decadent treat.
- Chocolate Fondue: Use the cookies as dippers with melted dark or white chocolate.
Snack and Dessert Boards
- Cheese Board: Include mild cheeses like brie or cream cheese, along with gluten-free crackers and fresh fruit for a mix of flavors.
- Holiday Dessert Platter: Pair the cookies with gluten-free gingerbread cookies, chocolate-dipped pretzels, and caramel popcorn.
Savory Options
- Minty Cheeseball: A slightly sweet and minty cream cheese dip could be spread on gluten-free crackers for a fun twist.
- Charcuterie: Balance the sweetness with savory cured meats, gluten-free breads, and nuts.
Check out the recipe card below for this yummy gluten-free candy cane cookie recipe!
Festive, Gluten Free, Candy Cane Sugar Cookie Recipe
Ingredients
- 1 cup butter
- 1 cup powdered sugar
- 1 egg
- 1 tsp vanilla
- 1/2 tsp peppermint extract
- 3 cups gluten-free flour
- Natural Red Food Dye
Instructions
- In the bowl of a stand mixer fitted with the paddle attachment, combine the softened butter and powdered sugar. Beat on medium-high speed for 3-4 minutes, or until the mixture is light, fluffy, and pale in color.
- Add the egg, vanilla extract, and peppermint extract to the butter-sugar mixture. Mix on medium speed until fully combined, scraping down the sides of the bowl as needed.
- Gradually add the gluten-free flour, one cup at a time, mixing on low speed after each addition. Scrape down the sides of the bowl occasionally to ensure the flour is fully incorporated. The dough should come together and form a smooth consistency.
- Remove half of dough from the mixer and shape it into a disc. Wrap it tightly in plastic wrap and refrigerate. To the remaining dough still in the mixer, add a few drops of natural red coloring. Mix on low speed until the color is evenly distributed, adding more drops as needed to reach your desired red hue. Wrap the red dough in plastic wrap as well. Refrigerate both pieces of dough for at least 1 hour, or up to 3 days.
- Line baking sheets with parchment paper or silicone baking mats. Preheat your oven to 375°F (190°C).
- Line cookie sheets with parchment paper. Remove the dough from the refrigerator. Use a spoon or small cookie scoop to portion out equal amounts of the white dough and red dough, approximately the size of a walnut (about 1 tablespoon each). Roll each portion into a snake shape about 6 inches long. Gently twist one white piece and one red snake together to create the candy cane pattern and candy cane shape. Curve the top to form the hook of the candy cane and place on the prepared baking sheet. Repeat with the remaining dough. OPTIONAL: top with your favorite sprinkles (again – LOVE Supernatural) or sprinkle crushed peppermint candy on top of the cookies. Make sure to space out the candy cane pieces so they don’t touch during baking.
- (OPTIONAL)Once all the candy canes are shaped and arranged on the baking sheets, refrigerate them for 15 minutes. This step helps the cookies hold their shape while baking.
- Bake the cookies in the preheated oven for 8-10 minutes, or until the edges are just set and slightly golden. Avoid overbaking to keep the cookies soft.
- Remove the baking sheets from the oven and let cool 3 minutes before carefully sliding the parchment paper with the cookies onto a countertop or cooling rack. Let the cookies cool completely before attempting to move them, as they will be delicate when warm.
- Your candy cane sugar cookies are now ready to serve! Serve on your favorite Christmas cookie trays! Store them in an airtight container at room temperature for up to a week. For longer storage, freeze in a single layer, then transfer to a freezer-safe container.