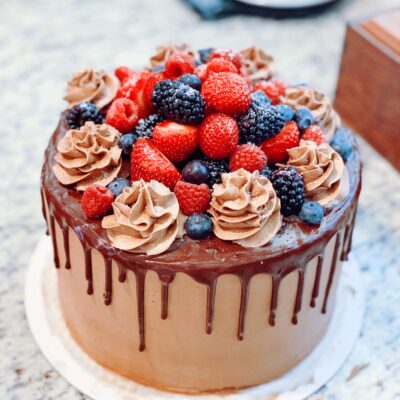
The BEST Gluten Free Chocolate Cake Recipe (EASY)
Ready for the best gluten-free chocolate cake recipe?! This gluten free chocolate cake is robust in flavor and has a perfectly moist texture. When paired with a creamy and decadent buttercream frosting, it’s a duo that will make your tastebuds happy! Chocolate and more chocolate is always a win, especially when it’s a cake! This is a nostalgic pair and a recipe worth keeping close. It is perfect for birthday celebrations, a special occasion, or really anytime you have a hankering to make a cake.
Growing up, my Grammy would always make a chocolate cake for birthday celebrations and it was the most moist and savory cake EVER. She would pair it with cappuccino chunky chocolate ice cream from Brahms, and it was oh my heavens – YUMMY! This cake recipe reminds me SO much of that cake she used to make and it is nostalgic heaven!
What makes this cake SO good:
- it’s SO fun to make!
- the robust flavors make it a showstopper of a cake
- perfect for any celebration!
- the chocolate cake is seriously so decadent and moist, the most perfect cake texture – you wouldn’t know it’s gluten free
- AND the buttercream is everything creamy in texture and full of rich chocolate flavor
- AND the chocolate ganache is a perfect touch of sophistication
What you need:
For the cake
- gluten free flour mixture (I use my AP gluten free flour blend or I love the Arrowhead Mills Gluten Free 1to1 Flour)
- cocoa powder
- baking powder
- baking soda
- guar gum (omit if your mix has xanthan gum or guar gum)
- salt
- milk
- sour cream
- sugar
- dark brown sugar
- eggs
- apple cider vinegar
- vanilla
- oil (I like avocado, but you could use coconut oil or canola oil)
- hot coffee or hot water
For the Buttercream
- butter (I love salted)
- powdered sugar
- heavy cream
- cocoa powder
- Vanilla extract
For the Ganache
- semisweet chocolate chips
- heavy whipping cream
On to the steps!
Gluten-Free Chocolate Cake – Honestly, there is nothing fancy about this recipe – it’s pretty traditional in it’s prep, which is one of the reason’s I love it!
Let’s preheat the oven to 350 degrees! This recipe will yield an 8″ three layer cake or a 9″ three layer cake. Which ever you choose, line the bottom of the cake pans with parchment paper to avoid the cake sticking to the pans after baking! I just ordered the Caraway cake pan set and I am so excited to try them out! Currently I use the Big Daddio pans, but I love the non-toxic traits of Caraway!
Next up, the dry ingredients. In a large bowl combine flour, cocoa powder, baking powder, baking soda and salt and whisk to combine. I have used Bob’s Red Mill and Arrowhead Mills all-purpose flours, but recently have been on a journey to create my own all purpose flour blend that doesn’t contain rice flours (I wanted create a protein content) or xanthan gum for binding (I don’t really trust how this is processed which makes it a big NO for me). I think I just about have it, and will be created a blog post sharing it once I have tested it on a few more recipes!
For the wet ingredients, use a stand mixer. Add in the sugars, eggs, milk, sour cream, apple cider vinegar, oil and vanilla. I prefer using the paddle attachment to blend all the ingredients together. For the oil, I love to avocado oil! But you could use coconut oil (melted), vegetable oil or canola oil. I love using a combination of sour cream and milk here – it almost replicates a buttermilk, but from my experience, gluten free baking tends to do better with a milk/sour cream combination, as opposed to buttermilk (I don’t know the science behind it – just observations!). And don’t skimp on the vanilla – it’s a gold mine when baking!
Slowly add the dry ingredients to the wet ingredients using a paddle attachment to fold in the dry ingredients, but be sure to not over mix.
Once the dry ingredients are completely incorporated, slowly add the hot coffee to the stand mixer until the mixture is smooth. Chefs kiss with this ingredient as the cake batter becomes so fragrant and creamy smooth. YUM!!
Time to bake! Evenly distribute the cake batter between the cake pans. I love to use my kitchen scale to make sure the weight is evenly distributed, but if you don’t have one, use a 1 cup measure to alternate adding batter to the pans. Then, using a slanted spatula, spread the batter into a flat plane. Pop the pans into the oven for 25-30 minutes (I always check at 20 minutes bake time). When you touch the center of the cake and it springs back quickly, your cake is ready!
I always let the cake cool for 10 minutes before turning it onto a cooling rack – then, of course we will let the cake cool completely before assembling, otherwise the buttercream frosting will melt into a disaster! You can always pop the cakes into the refrigerator after they have cooled for 10 minutes, to make the rest of the cooling process quicker
While the cake is cooling, let’s make the delicious buttercream!
For the Chocolate Buttercream Frosting
- Using the stand mixer with a paddle attachment, beat the butter until smooth.
- On a low speed, add the cocoa powder to the butter until completely combined.
- Slowly and on a low speed add the powdered sugar, alternating, 2 cups of sugar and a tablespoon of heavy cream, until the ingredients have been added.
- Add in the vanilla and set the mixer to medium speed and beat for 5 minutes. This will yield the most creamy, smooth buttercream!
For the Ganache
- Heat the heavy cream, either over the stove or in the microwave. If using the stove, heat over low heat until scalded. If heating in the microwave, heat for 20 second intervals until warmed.
- Pour the chocolate chips into the warmed milk and let it set for 3-5 minutes.
- Then, stir the mixture until smooth and creamy. Let this mixture cool completely before using it on the cake (you don’t want to melt the buttercream!).
To Assemble:
This part is my FAVORITE! And if you are a visual learner, here is a Reel I posted on Instagram to help learn the steps!
- Add a small amount of buttercream to the center of the cake board, this will keep the cake from sliding around. Then place the first cake layer in the center of the cake board. Plop some buttercream on the cake and use a slanted spatula to spread the buttercream in an even layer. Sometimes I like to sprinkle a little something to add texture to the overall cake – like mini chocolate chips or crushed chocolate cookies!
- Place the second cake layer on top of the buttercream, and repeat step one.
- For the third layer, you will flip the cake to the bottom faces up before placing on the cake. This will help give you a nice corner edge for the cake when frosting.
- Crumb coat the entire cake with a thin layer of the buttercream and pop it into the freezer for about 10 to 15 minutes to set this layer of frosting.
- Once the crumb coat is set, continue to frost the cake with the remaining frosting. I like to use a cake edger or scraper, but you don’t have to use this. You can always create a rustic look with a spatula or use the back of the spatula, while you spin the cake on a cake spinner to create cute rings around the cake.
- This last step is up to you! I like to add a pretty chocolate ganache to the top of the cake. There are lots of ways to do this but my favorite is to use these bottles – they make controlling the drip on the edge of the cake so easy! But you could also use a piping bag with a small tip, or a quart size plastic bag with a small hole snipped in the corner of the bag.
TIPS:
- When working with gluten free cake, for best results, it’s best to chill the cake layers before assembling – you can wrap them in plastic wrap before refrigerating.
- Buttercream is easiest to work with at room temperature!
- I use straws to insert into the cake to keep it steady
- Keep the cake in the refrigerator until 2 hours before serving it
This is one of my go-to cake recipes! It’s easy for beginner bakers and so yummy, people don’t believe it’s gluten free! Cake is a love language all on it’s own and this cake is perfect for any occasion of celebration!
Check out the recipe card below!
The BEST Gluten Free Chocolate Cake Recipe (EASY)
Ingredients
For the Cake
- 4 cups gluten-free flour
- 1½ cups cocoa powder
- 2¼ tsp baking powder
- 1½ tsp baking soda
- 1 tbsp guar gum or xanthan gum Omit if your flour blend already has a gum
- 1½ tsp salt
- 1 cup whole milk
- 1/2 cup sour cream
- 1¼ cups sugar
- 1¼ cups dark brown sugar
- 5 eggs
- 1½ tsp apple cider vinegar
- 1 cup avocado oil
- 1½ cups hot coffee
For the Buttercream
- 2 cups salted butter softened
- 1/2 cup cocoa powder
- 4-5 cups powdered sugar
- 4 tbsp heavy cream
- 2 tsp vanilla
For the Ganache
- 1 cup semisweet chocolate chips
- 1 cup heavy cream
Instructions
For the Cake
- Preheat oven to 350° and line the bottom of your cake pans with parchment
- In a medium bowl combine flour, cocoa powder, baking soda and salt – whisk to combine.
- In a stand mixer add the sugars, eggs, milk, acv, oil and vanilla – whisk to combine
- Slowly add the dry ingredients to the wet ingredients- whisk to incorporate
- Slowly add the hot coffee to the stand mixer until it is incorporated
- Evenly distribute the batter between the three pans and pop into the oven for 25-30 minutes (I’d check at 20 minutes)
- Let the cake cool for 10 minutes before turning it onto a cooling rack – let the cake cool completely before assembling – I like to pop mine into the refrigerator before assembling
- While the cake bakes and cools lets make the filling and the buttercream!
For the Buttercream
- Using the stand mixer with a paddle attachment, beat the butter until smooth.
- On a low speed, add the cocoa powder to the butter until completely combined.
- Slowly and on a low speed add the powdered sugar, alternating, 2 cups of sugar and a tablespoon of heavy cream, until the ingredients have been added.
- Add in the vanilla and set the mixer to medium speed and beat for 5 minutes. This will yield the most creamy, smooth buttercream
For the Ganache
- Heat the heavy cream, either over the stove or in the microwave. If using the stove, heat over low heat until scalded. If heating in the microwave, heat for 20 second intervals until warmed.
- Pour the chocolate chips into the warmed milk and let it set for 3-5 minutes.
- Then, stir the mixture until smooth and creamy. Let this mixture cool completely before using it on the cake (you don't want to melt the buttercream!).
For Assembly
- Add a small amount of buttercream to the center of the cake board, this will keep the cake from sliding around. Then place the first cake layer in the center of the cake board. Plop some buttercream on the cake and use a slanted spatula to spread the buttercream in an even layer. Sometimes I like to sprinkle a little something to add texture to the overall cake – like mini chocolate chips or crushed chocolate cookies!
- Place the second cake layer on top of the buttercream, and repeat step one.
- For the third layer, you will flip the cake to the bottom faces up before placing on the cake. This will help give you a nice corner edge for the cake when frosting.
- Crumb coat the entire cake with a thin layer of the buttercream and pop it into the freezer for about 10 to 15 minutes to set this layer of frosting.
- Once the crumb coat is set, continue to frost the cake with the remaining frosting. I like to use a cake edger or scraper, but you don’t have to use this. You can always create a rustic look with a spatula or use the back of the spatula, while you spin the cake on a cake spinner to create cute rings around the cake.
- This last step is up to you! I like to add a pretty chocolate ganache to the top of the cake. There are lots of ways to do this but my favorite is to use these bottles – they make controlling the drip on the edge of the cake so easy! But you could also use a piping bag with a small tip, or a quart size plastic bag with a small hole snipped in the corner of the bag.
A gluten free chocolate cake that is robust in flavor and has a perfectly moist texture, paired with a creamy and decadent buttercream frosting, is a duo that will make your tastebuds happy! Chocolate and more chocolate is always a win, especially when it’s a cake! This is a nostalgic pair and a recipe worth keeping close. It is perfect for birthday celebrations, special occasions or really anytime you have a hankering to make a cake.
Growing up, my Grammy would always make a chocolate cake for birthday celebrations and it was the most moist and savory cake EVER. She would pair it with cappuccino chunky chocolate ice cream from Brahms, and it was oh my heavens – YUMMY! This cake recipe reminds me SO much of that cake she used to make and it is nostalgic heaven!
TIPS:
- When working with gluten free cake, for best results, it’s best to chill the cake layers before assembling – you can wrap them in plastic wrap before refrigerating.
- Buttercream is easiest to work with at room temperature!
- I use straws to insert into the cake to keep it steady
- Keep the cake in the refrigerator until 2 hours before serving it
What makes this cake SO good:
- it’s SO fun to make!
- the robust flavors make it a showstopper of a cake
- perfect for any celebration!
- the chocolate cake is seriously so decadent and moist, the most perfect cake texture – you wouldn’t know it’s gluten free
- AND the buttercream is everything creamy in texture and full of rich chocolate flavor
- AND the chocolate ganache is a perfect touch of sophistication
This is one of my go-to cake recipes! It’s easy for beginner bakers and so yummy, people don’t believe it’s gluten free! Cake is a love language all on it’s own and this cake is perfect for any occasion of celebration!


What kind of flour do you use?
My favorite is Arrowhead Mills Gluten Free 1 to 1 Flour!