Soft and Easy Gluten Free Sandwich Bread Recipe
There’s nothing quite like the comfort of a freshly baked loaf of bread. For those of us navigating the world of gluten-free baking, however, finding the perfect sandwich bread can feel like searching for a needle in a haystack. Store-bought options often fall short, leaving us with dense, crumbly slices that lack the softness and flavor we crave. But what if I told you that making your own gluten-free sandwich bread at home is easier than you think—and the results are nothing short of life-changing?
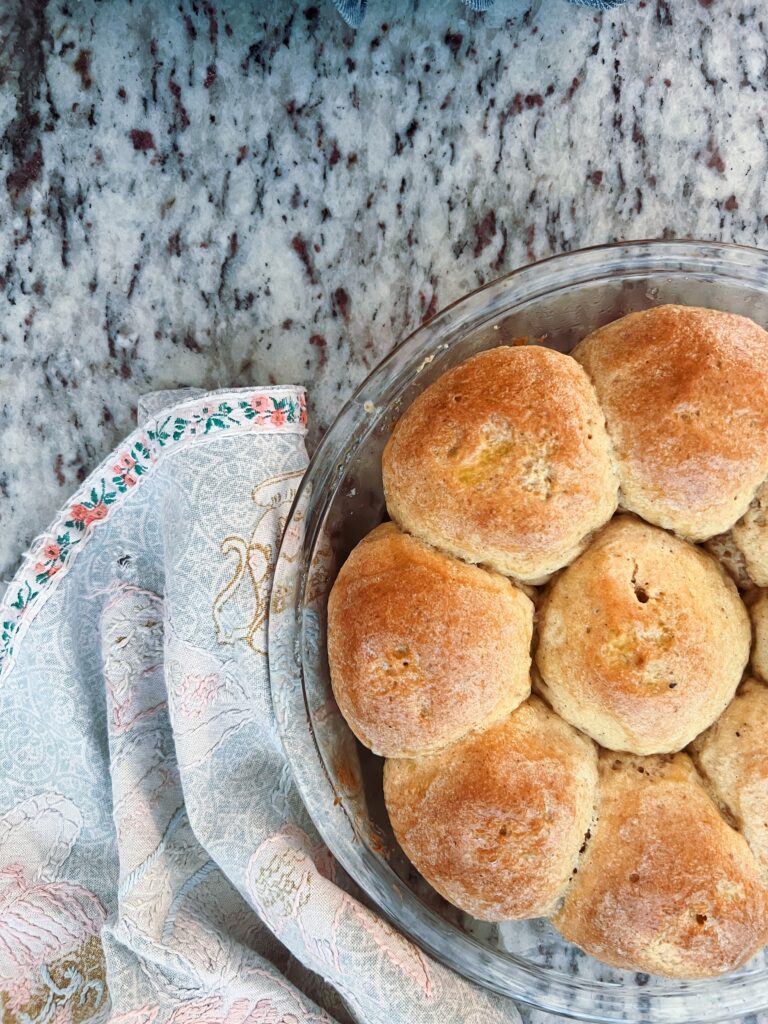
This recipe is a game-changer for anyone who’s ever missed a truly satisfying slice of bread. Soft, fluffy, and perfect for everything from peanut butter toast to a classic turkey sandwich, this bread holds its own in texture, taste, and versatility. Whether you’re a seasoned gluten-free baker or just starting your journey, this step-by-step guide will have you baking like a pro. Let’s dive into what makes this bread so special and how you can recreate it in your own kitchen! This is obviously one of my favorite homemade recipes – let’s make it!

***NOTE I have not tested this recipe with other gluten free bread flours.
What You Will Love About This Recipe:
- Once you have a big batch of gluten free bread flour, this recipe follows those similar to regular bread baking!
- It yields sandwich bread the whole family will love – even those that don’t need to eat gluten-free.
- It isn’t full of nasty ingredients like those you will find in grocery stores
- You will have the joy and honor of making fresh bread for your family again!
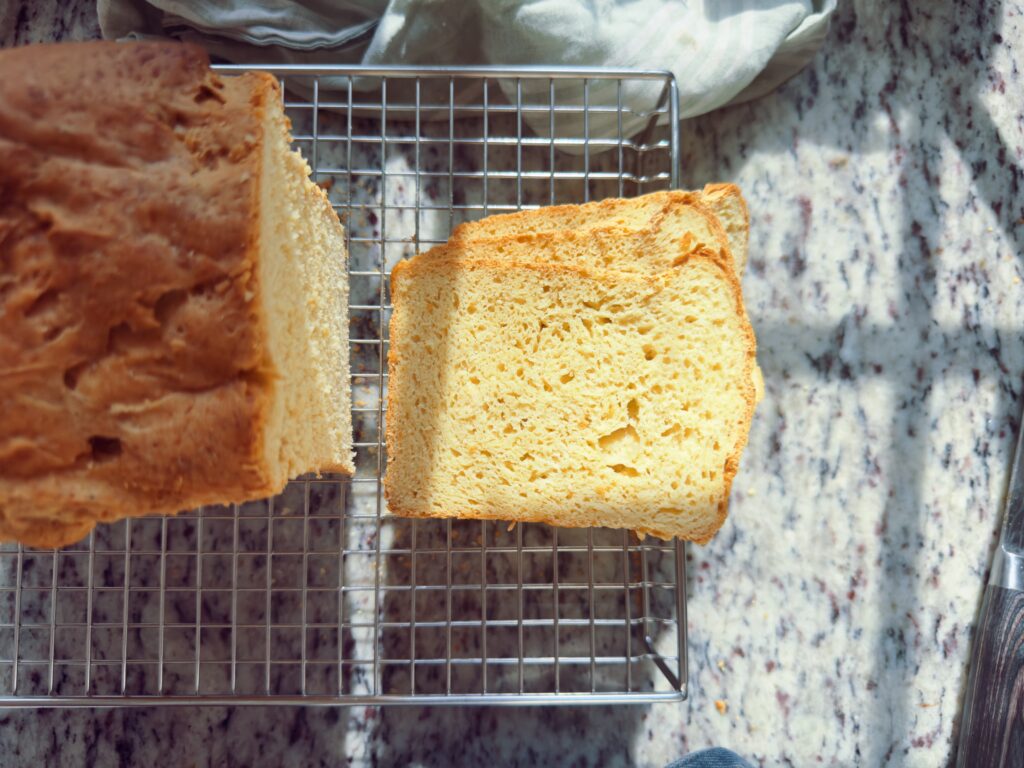
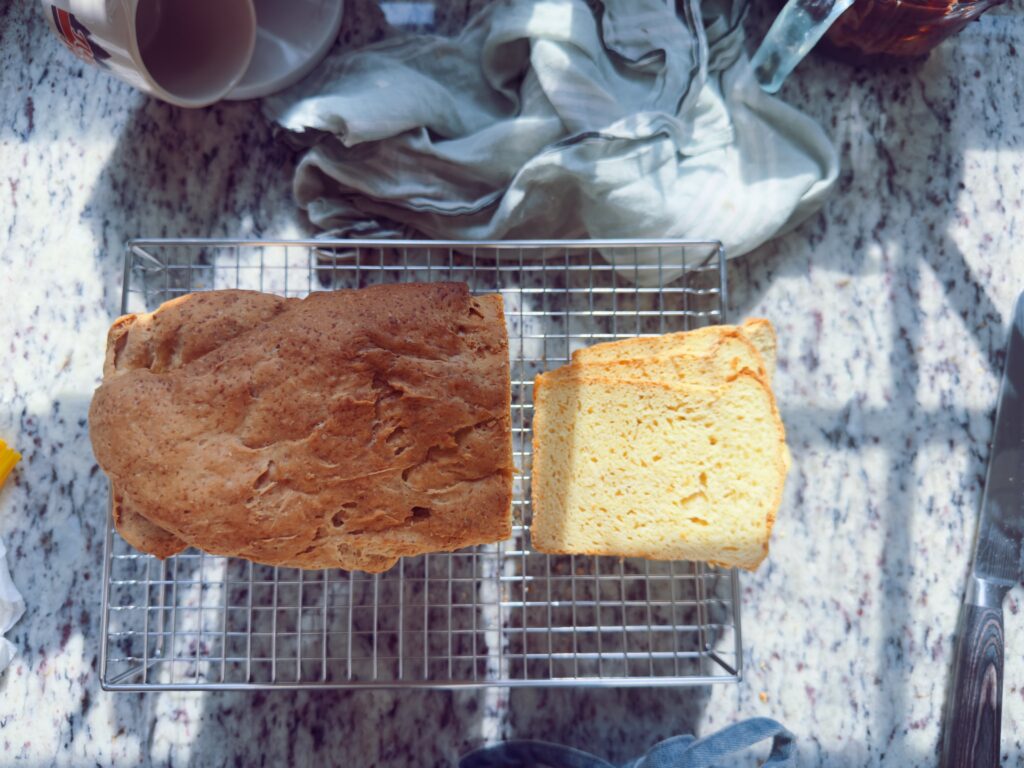
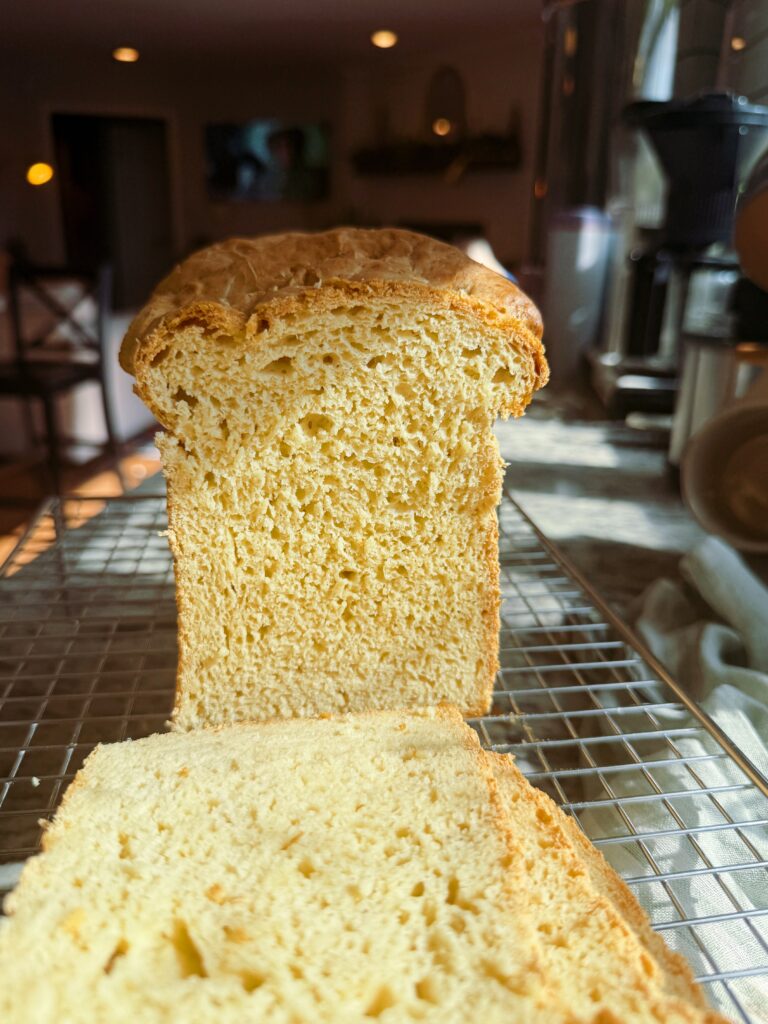
- This recipe makes a loaf that has a beautiful, soft texture!
- The flavor of this bread is a perfect blend of nutty and sweet – perfect for sandwiches or morning toast!
Looking for a different yeast bread recipe? Check out the other bread recipes I have on my blog! (I will be making a separate page for bread baking soon – because the number of recipes growing!) And check out the recipe card below for all the exact measurements for this gf bread recipe!
Gluten-Free Sandwich Bread Ingredients:
- Gluten-Free Bread Flour Blend: Use a high-quality gluten-free flour blend designed for yeast baking (I use my bread flour blend which is a combination of sorghum flour, millet flour, arrowroot flour, potato starch and oat flour. I have not tested this recipe with other flour blends.)
- Active Dry Yeast: Use 2 1/4 teaspoons (1 packet) of yeast for a perfectly risen loaf. Make sure it’s gluten-free certified and fresh. Activate the yeast in warm water (115°F) with honey for 5–10 minutes until foamy.
- Psyllium Husk Powder: Use 4 tablespoons to help bind the dough and improve elasticity. This ingredient mimics gluten and creates a better texture.
- Baking Powder: Add 1 teaspoon to give the bread an extra rise and lighter texture. Ensure it’s gluten-free certified.
- Salt: Use 1 teaspoon of fine sea salt to enhance the bread’s flavor and balance sweetness.
- Warm Water (115°F): You’ll need 1 cup of warm water to activate the yeast and hydrate the dough. Use a thermometer to check the temperature; too hot will kill the yeast, and too cool will prevent proper activation.
- Eggs (Room Temperature): Use 1 large egg for structure and moisture. Bringing them to room temperature ensures they mix evenly with the dough.
- Honey: Use 2 tablespoons for a touch of sweetness and to help activate the yeast. Maple syrup or agave can be substituted if needed.
- Avocado Oil or Olive Oil: Add 1/4 cup for moisture and richness. Choose a mild-flavored oil for the best results.
- Apple Cider Vinegar: triggers a chemical reaction that produces carbon dioxide, helping the bread rise better and become lighter and airier, and can slightly tighten and strengthen the structure of the dough or batter, compensating for the lack of gluten
Gluten-Free Sandwich Bread Recipe:
Storage Tips
To keep your bread fresh, store it in a gallon-sized zip-top bag with all the air squeezed out. Avoid refrigerating it, as this can dry out gluten-free bread. Store at room temperature for up to 4–5 days. For longer storage, slice the bread and freeze it in an airtight container or bag, with parchment paper between slices for easy removal.e when it comes to recipes and gluten free baking! And I can’t wait to keep expanding my yeast bread recipes for you all! I am currently dreaming about the cinnamon raisin bread my dad always makes for Christmas presents, or the orange braid greek bread my mom always use to make…. cheers to successes and cheers to onward baking endeavors!
Mix the Dry Ingredients
In the bowl of a stand mixer fitted with a paddle attachment, combine the gluten-free bread flour blend (I use my kitchen scale to weigh and measure the flour), salt, psyllium husk powder, and baking powder. Mix on low speed until fully combined. Alternatively, you can mix these ingredients by hand in a large bowl using a whisk to evenly distribute them.
Activate the Yeast
In a small bowl, stir the honey into the warm water (115°F) until dissolved. Sprinkle the active dry yeast over the top and give it a gentle stir. Let it sit for 5–10 minutes until the mixture becomes foamy and bubbly. This indicates the yeast is activated and ready to use.
Incorporate Wet Ingredients
Turn the stand mixer to low speed and slowly pour the activated yeast mixture into the dry ingredients. Once incorporated, add the room-temperature eggs, oil and apple cider vinegar. Gradually increase the mixer speed to medium, ensuring all ingredients are combined.
Knead the Gluten-Free Bread Dough
Turn the mixer to medium-high speed and beat the bread dough for 5 minutes. This step is crucial for developing structure in gluten-free bread. The dough should be thick but sticky, resembling a thick cake batter rather than traditional bread dough.
Prepare the Loaf Pan and Let the Bread Rise
Grease a standard 9×5-inch bread loaf pan with oil or nonstick spray. Pour the dough into the pan and smooth the top with a rubber spatula. Cover the pan with plastic wrap, parchment paper or a damp kitchen towel. Place the pan in a warm place to rise—an oven with the light on works perfectly. Let the dough rise for about 30 minutes, but do not let it overproof (the dough should just crest the top of the loaf pan).
Bake the Bread
Preheat your oven to 350°F (175°C). Once the dough has risen, bake the bread in the preheated oven for 40 to 50 minutes, or until the loaf is golden brown and the internal temperature reaches 205°F (use an instant-read thermometer to check).
Add a Buttery Finish
Immediately after removing the bread from the oven, brush the top of the loaf with butter (or dairy-free alternative, if preferred) for extra flavor and a soft crust.
Cool Completely
Allow the loaf to cool in the pan for 5 minutes, then gently turn it out onto a cooling rack and wire rack. Let the bread cool completely—at least 2 hours—before slicing. Cutting too soon can result in a gummy texture inside. Be patient!
Here are some delicious and versatile pairings that go perfectly with gluten-free sandwich bread:
Savory Pairings
- Classic Sandwiches
- Turkey & Avocado: Layer sliced turkey, avocado, lettuce, and tomato for a fresh and filling sandwich.
- Grilled Cheese: Use sharp cheddar or a mix of cheeses with gluten-free butter for a crisp, melty treat.
- Egg Salad or Chicken Salad: Perfect for a creamy, protein-packed option.
- BLT: Bacon, lettuce, and tomato with a smear of mayonnaise or avocado for extra richness.
- Toast Toppings
- Avocado Toast: Mashed avocado with a sprinkle of salt, red pepper flakes, and a drizzle of olive oil or balsamic glaze.
- Hummus & Veggies: Spread hummus on toasted slices and top with thinly sliced cucumbers or roasted red peppers.
- Savory Spread: Try smoked salmon with cream cheese and capers for a bagel-style twist.
- Soup & Sandwich Combos
- Pair your bread with gluten-free soups like creamy tomato, chicken noodle, or butternut squash soup for a comforting meal.
- Open-Faced Sandwiches
- Caprese Style: Mozzarella, tomato, and fresh basil drizzled with olive oil and balsamic reduction.
- Egg & Spinach: A fried egg with sautéed spinach and a sprinkle of parmesan cheese.
Sweet Pairings
- Toast with Spreads
- Nut Butters: Almond, peanut, or sunflower seed butter topped with banana slices or a drizzle of honey.
- Jam & Butter: Classic strawberry, raspberry, or apricot jam paired with salted butter for a nostalgic treat.
- Cream Cheese & Berries: Spread with whipped cream cheese and top with fresh blueberries or sliced strawberries.
- French Toast
- Use your bread to make gluten-free French toast by soaking slices in an egg-milk mixture, frying, and topping with maple syrup, cinnamon, and powdered sugar.
Snacks & Appetizers
- Bruschetta
- Toast slices of bread and top with chopped tomatoes, garlic, basil, and olive oil.
- Mini Sandwiches
- Cut the bread into small squares and make bite-sized sliders with ham, cheese, or roasted veggies.
- Crostini
- Top toasted slices with herbed goat cheese, honey, and walnuts for an elegant appetizer.
I hope you LOVE this recipe! It has taken me years, and then really intense months of trial and error to find out that yeast breads require a different blend. Then more months of trial and error to find that blend. Then several weeks of nonstop baking to make sure it works with my yeast bread recipes! What made it more complicated was removing rice flours and xanthan gum – WHEW! But totally worth! I knew I was successful when my husband (who can have gluten) tasted a piece of bread and was like “WOW, that’s good”. He is always very honest with me when it comes to recipes and gluten free baking! And I can’t wait to keep expanding my yeast bread recipes for you all! I am currently dreaming about the cinnamon raisin bread my dad always makes for Christmas presents, or the orange braid greek bread my mom always use to make…. cheers to successes and cheers to onward baking endeavors!
Happy baking!

Gluten Free Sandwich Bread Recipe
Print RecipeIngredients
- 450 grams bread flour blend
- 2 1/4 tsp instant yeast
- 2 tsp xanthan gum can substitute 1 flax egg or 3 additional tbsp of psyllium husk
- 2 tsp baking powder
- 1 tsp salt
- 1 cup warm water
- 3 tbsp whole psyllium husk
- 2/3 cup whole milk (115 degrees)
- 1/4 cup sugar or honey
- 2 eggs (room temperature)
- 1/8 cup avocado oil or butter, softened
- 1 tsp apple cider vinegar
Instructions
- Combine the flour blend, yeast, xanthan gum, baking powder and salt in your stand mixer and combine with a paddle attachment. You could also do this by hand in a large bowl and combine with a whisk.
- Combine psyllium husk and water in a small bowl and set aside for 5 minutes to create a gel.
- Warm the milk and sugar/honey to 115 – 120 degrees. I normally do this over the stovetop. Add to stand mixer to activate the yeast.
- Once the water and sugar/honey are incorporated, add in your psyllium gel, eggs, oil and vinegar.
- Turn the mixer to medium high speed and beat the bread dough for 5 minutes.
- Pour dough into a greased loaf pan, cover will plastic wrap or a damp kitchen towel. Place in a warm spot (always place it in my oven with the oven light on) for the rising process. Let it rise for 30 minutes (remember – DO NOT OVERPROOF). I always start preheating my oven when the bread has risen for 15 minutes so my oven is well heated.
- Put a cast iron pan on the bottom rack of the oven and preheat the oven to 350 degrees. Once the bread has risen for 30 minutes or has doubled in size, throw a handful of ice cubes into the heated cast iron skillet and Bake the bread for 40 to 50 minutes or until the internal temperature reaches 205 degrees.
- My mama always slathered butter on top of the loaf right when it came out of the oven, so I follow suit! Then let the loaf cool in the bread pan for 5 minutes before turning it out to cool on a cooling rack.
- This is the hard part – YOU MUST WAIT AT LEAST 2 HOURS BEFORE EATING! I know, I know, it is so hard! But if you cut into your bread loaf right away, you will end up with goop.
- For storage, I don’t like to keep my bread in the refrigerator as it tends to dry out gluten free bread. I prefer to store my bread in a gallon size ziplock (make sure you squeeze all the air out). Enjoy within 4-5 days.
Why You Should Make Your Own Gluten-Free Bread
Going gluten-free is a necessity for many, whether due to celiac disease, gluten sensitivity, or a desire to eat a cleaner diet. But if you’ve ever bought gluten-free bread at the store, you’ve probably noticed a few common issues: high prices, strange ingredients, and an often disappointing texture.
What if you could have delicious, fresh, gluten-free bread without the hassle of searching through different brands, paying premium prices, or dealing with preservatives? The answer is simple: make your own!
Baking your own gluten-free bread gives you complete control over ingredients, taste, and nutrition. It also saves money, reduces food waste, and provides the satisfaction of creating something homemade. In this article, we’ll explore the many reasons why making your own gluten-free bread is one of the best decisions you can make.
1. Store-Bought Gluten-Free Bread Often Falls Short
If you’ve been eating gluten-free for a while, you know the struggle of finding a decent loaf of bread. The gluten-free bread aisle is often filled with:
- Expensive loaves – A single loaf can cost anywhere from $5 to $10, and for a family, that adds up quickly.
- Dry, crumbly textures – Many gluten-free breads lack moisture and structure, making them unpleasant to eat.
- Strange aftertastes – Some brands use artificial flavors or excess gums to compensate for the missing gluten, resulting in odd flavors.
- Small, dense slices – Many gluten-free loaves are significantly smaller than traditional wheat bread but cost twice as much.
Making your own gluten-free bread ensures that you get the best texture, taste, and nutrition—without the frustration of buying an overpriced, unsatisfying loaf.
2. Homemade Gluten-Free Bread Tastes Better
Nothing compares to the taste of freshly baked bread. When you make your own gluten-free bread, you can create a soft, flavorful loaf that beats anything you’ll find at the store.
Why Store-Bought Bread Tastes Stale
Many commercial gluten-free breads have a long shelf life because they contain preservatives and stabilizers. These ingredients keep the bread from spoiling, but they also affect its taste and texture.
When you bake at home, your bread is naturally fresh, warm, and fragrant. You won’t have to toast it just to make it edible—it’ll taste great right out of the oven.
Customize the Flavor to Your Liking
Store-bought gluten-free bread is often bland, but when you bake at home, you can experiment with different flavors. Try adding:
- Olive oil or butter for richness.
- Honey or maple syrup for a touch of natural sweetness.
- Garlic, rosemary, or basil for a savory twist.
- Cinnamon and raisins for a sweet breakfast loaf.
This level of customization ensures that every bite is enjoyable.
3. Full Control Over Ingredients
When you buy gluten-free bread at the store, you might find ingredients you don’t recognize. Many brands use:
- Preservatives to extend shelf life.
- Excess starches and gums to mimic the structure of gluten.
- Unhealthy oils like soybean or palm oil.
- Added sugars to improve flavor.
By making your own bread, you get to decide exactly what goes into it. You can choose organic, non-GMO, and whole-food ingredients that align with your dietary preferences.
Avoiding Common Allergens
Many gluten-free breads contain dairy, eggs, or soy. If you have multiple food sensitivities, it can be challenging to find a suitable brand. Baking at home allows you to make a loaf that’s free from common allergens while still being delicious.
4. More Nutritious Than Store-Bought Options
Many commercial gluten-free breads lack essential nutrients. They rely heavily on white rice flour, cornstarch, or tapioca starch, which provide little fiber, protein, or vitamins.
Boost Nutrition with Whole-Grain Flours
When you bake at home, you can incorporate nutrient-dense gluten-free flours like:
- Quinoa flour – High in protein and amino acids.
- Sorghum flour – Rich in fiber and antioxidants.
- Teff flour – A great source of iron and calcium.
- Oat flour (certified gluten-free) – High in fiber and supports digestion.
By choosing whole-grain flours, you make a loaf that’s more satisfying, nourishing, and beneficial for digestion.
More Protein and Fiber
Homemade gluten-free bread allows you to add ingredients that increase its nutritional value. Try adding:
- Chia seeds or flaxseeds for fiber and omega-3s.
- Almond flour for protein and healthy fats.
- Pumpkin or sunflower seeds for added crunch and nutrients.
5. Cost Savings Add Up
Gluten-free bread is notoriously expensive. If you’re eating gluten-free daily, buying pre-made loaves can become a major expense.
The Cost Breakdown
A single loaf of gluten-free bread can cost $6 or more, while the ingredients for homemade gluten-free bread often cost less per loaf in the long run. If you bake regularly and buy ingredients in bulk, you’ll save even more.
Freeze Extra Loaves for Convenience
Baking in batches and freezing extra loaves saves money and time. Simply slice your bread before freezing, so you can take out individual pieces as needed.
6. Reduces Food Waste
One of the biggest issues with store-bought gluten-free bread is waste. Many loaves go stale or mold quickly due to their ingredient composition. Since these loaves are often expensive, throwing them away feels like throwing money in the trash.
With homemade bread, you can control portions, bake only what you need, and store it properly to reduce waste. If you have leftover bread, you can:
- Turn it into croutons for soups and salads.
- Make gluten-free breadcrumbs for cooking.
- Use it for French toast or bread pudding.
This flexibility means you get the most out of every loaf.
7. Fun and Rewarding to Bake
Baking your own gluten-free bread is a satisfying experience. It allows you to:
- Learn new baking techniques.
- Experiment with different flours and flavors.
- Enjoy the process of creating something from scratch.
Even if you’re new to gluten-free baking, it’s a skill worth developing. With time and practice, you’ll master the process and discover your favorite bread recipes.
8. Environmentally Friendly
Making your own bread is also a more sustainable choice. Store-bought bread is often packaged in plastic, and frequent grocery store trips contribute to carbon emissions.
By baking at home, you can:
- Reduce plastic waste by storing bread in reusable bags.
- Support local farmers by buying gluten-free flour from small businesses.
- Limit food waste by only baking what you need.
These small changes help create a more eco-friendly lifestyle.
Final Thoughts
Making your own gluten-free bread is one of the best ways to improve your gluten-free diet. It allows you to enjoy:
- Better taste and texture.
- Control over ingredients and nutrition.
- Cost savings over time.
- A fun and rewarding baking experience.
If you’ve struggled with store-bought gluten-free bread, it’s time to try making your own. The process is easier than you think, and the benefits far outweigh the effort. Once you experience the taste of fresh, homemade gluten-free bread, you may never go back to store-bought again! Give it a try—you’ll be amazed at how much better homemade gluten-free bread can be.
Making your own gluten-free bread is one of the best decisions you can make for your health, budget, and overall food experience. Not only will you enjoy better taste, texture, and nutrition, but you’ll also save money, reduce waste, and gain a sense of accomplishment in the kitchen. While it may take some trial and error to find the perfect recipe, the benefits far outweigh the challenges. Whether you’re baking for yourself or your family, homemade gluten-free bread is a worthwhile investment that will transform your gluten-free lifestyle. So why settle for dry, expensive, and flavorless store-bought bread when you can create something fresh, delicious, and tailored to your needs? Give homemade gluten-free bread a try—you won’t regret it!
The Benefits of Gluten-Free Bread: Why It’s a Smart Choice
Gluten-free bread has gained popularity over the years, not just among those with celiac disease or gluten sensitivity but also among people looking for a healthier lifestyle. While gluten-free bread was once considered a bland, dense alternative to traditional wheat bread, advancements in gluten-free baking have led to tastier, more nutritious options.
But why should you choose gluten-free bread? Whether you’re avoiding gluten due to health concerns or simply curious about the benefits, this article will explore why gluten-free bread is a great choice for many people.
1. Essential for Those with Gluten-Related Disorders
Celiac Disease
For people with celiac disease, eating gluten triggers an autoimmune response that damages the small intestine. Over time, this damage can lead to malnutrition, digestive issues, fatigue, and more serious health complications. Gluten-free bread is essential for celiac sufferers because it allows them to enjoy bread without the risk of harming their bodies.
Gluten Sensitivity and Wheat Allergies
Many people experience symptoms like bloating, headaches, joint pain, and fatigue after consuming gluten, even without having celiac disease. This condition, known as non-celiac gluten sensitivity, can significantly impact daily life. Wheat allergies can also cause adverse reactions, making gluten-free bread a safer alternative.
By choosing gluten-free bread, those with gluten-related disorders can continue enjoying a staple food without discomfort or health risks.
2. Improved Digestion and Gut Health
Easier to Digest
Gluten can be difficult to digest for some people, even those without a diagnosed condition. It requires specific enzymes to break down, and if your digestive system struggles to process it, you may experience bloating, cramps, or irregular bowel movements.
Many gluten-free breads are made with easier-to-digest ingredients like rice flour, almond flour, or sorghum flour, which can be gentler on the stomach.
Supports Gut Health
Some gluten-free breads contain ingredients that actively support gut health. For example:
- Oat flour (certified gluten-free) – Contains beta-glucan, which promotes healthy gut bacteria.
- Flaxseed meal – High in fiber, supporting digestion and bowel regularity.
- Psyllium husk – Helps with digestive health and acts as a natural prebiotic.
By choosing gluten-free bread with wholesome ingredients, you can improve gut health while avoiding gluten-related digestive distress.
3. Can Help Reduce Inflammation
For individuals with autoimmune disorders or chronic inflammation, gluten can be a trigger. In some cases, gluten causes an immune response that increases inflammation, leading to joint pain, headaches, skin issues, and fatigue.
By eliminating gluten and choosing gluten-free bread, many people experience reduced inflammation, fewer aches and pains, and improved overall well-being.
Additionally, some gluten-free breads contain anti-inflammatory ingredients such as:
- Almond flour – Contains healthy fats and vitamin E, which help reduce inflammation.
- Turmeric-infused bread – Some specialty gluten-free breads incorporate turmeric, a powerful anti-inflammatory spice.
If you struggle with inflammatory conditions like arthritis or autoimmune diseases, switching to gluten-free bread may help reduce symptoms.
4. Provides More Nutrient-Dense Options
Many traditional breads rely on refined white flour, which lacks essential nutrients. Gluten-free bread, on the other hand, is often made with a mix of alternative flours that are naturally more nutrient-dense.
Gluten-Free Flours and Their Benefits
- Sorghum flour – High in antioxidants, fiber, and protein.
- Teff flour – A great source of iron and calcium.
- Buckwheat flour – Contains fiber, magnesium, and essential amino acids.
- Quinoa flour – High in protein and packed with vitamins.
By choosing gluten-free bread with whole-grain flours, you get more vitamins, minerals, and fiber in each slice.
5. May Support Weight Management
Some people find that removing gluten from their diet helps with weight management. While gluten itself is not necessarily responsible for weight gain, many foods that contain gluten—like white bread, pastries, and processed snacks—are high in empty calories and sugar.
More Fiber, Less Overeating
Many gluten-free breads contain higher amounts of fiber than traditional white bread, which helps:
- Keep you fuller for longer.
- Reduce cravings for unhealthy snacks.
- Stabilize blood sugar levels.
If you’re looking for a healthier approach to weight management, switching to a fiber-rich gluten-free bread can be a smart choice.
6. Suitable for People with Multiple Food Sensitivities
Many gluten-free breads are also free from other common allergens, making them a safer choice for individuals with multiple food sensitivities. Many brands or homemade recipes avoid:
- Dairy
- Soy
- Eggs
- Nuts (depending on the recipe)
For those with multiple allergies, gluten-free bread provides a way to enjoy bread without worrying about unwanted reactions.
7. No More Bloating or Brain Fog
Many people who go gluten-free report feeling lighter, more energetic, and more mentally clear. This is because gluten can sometimes cause bloating, sluggish digestion, and even brain fog in sensitive individuals.
Switching to gluten-free bread may help:
- Reduce water retention and bloating.
- Improve mental clarity and focus.
- Increase energy levels throughout the day.
If you’ve ever felt sluggish after eating traditional bread, gluten-free bread may be a better option for you.
8. Expands Your Culinary Creativity
Going gluten-free encourages you to explore new types of bread that you might not have tried otherwise. Instead of relying on standard white or whole wheat bread, you can enjoy a variety of flavors and textures, such as:
- Seeded gluten-free loaves – Packed with sunflower, flax, or chia seeds.
- Savory herb-infused breads – Like rosemary and garlic bread.
- Sweet cinnamon-raisin bread – A delicious breakfast option.
By embracing gluten-free bread, you open yourself up to exciting new flavors and baking possibilities.
9. Better for Blood Sugar Control
Traditional white bread and refined wheat bread often cause blood sugar spikes due to their high glycemic index. Gluten-free bread, especially when made with whole grains, can help regulate blood sugar levels more effectively.
Best Gluten-Free Breads for Blood Sugar Control
- Almond flour bread – Low in carbohydrates, high in healthy fats and protein.
- Oat flour bread – Slow-digesting carbs that keep blood sugar stable.
- Flaxseed or chia seed bread – High in fiber and omega-3s for better insulin response.
If you have diabetes or struggle with blood sugar regulation, choosing the right gluten-free bread can be an excellent way to maintain energy without crashes.
10. Supports a Cleaner Diet
Many people choose to eat gluten-free bread as part of a cleaner, more mindful diet. By eliminating processed wheat-based breads that often contain artificial additives, preservatives, and refined sugars, you make room for healthier, whole-food-based options.
When made with natural ingredients, gluten-free bread can be:
- Free from artificial preservatives.
- Lower in added sugars.
- **Made with whole, nutrient-dense ingredients