Soft and Easy Gluten Free Dinner Rolls Recipe
The holidays are full of traditions and baking and family and glorious smells.
For Thanksgiving every year, my mom would make chocolate and pumpkin pie, broccoli salad (in a valiant effort to balance all the carbs and sugar) and the DINNER ROLLS. The smell of them baking is so nostalgic for me, and gloriously floods my mind with memories of my childhood.
When I was diagnosed with Celiac Disease my Senior year of high school (over a decade ago, ekk), I kissed good bye to a lot of traditions and baking in general. It was awful. The options for gluten free back then were comparable to cardboard and sawdust. Flour substitutes resulted in gummy or brick-like texture. Heartbreaking indeed.
The season of rolls is upon us! And I am sharing my tried and true gluten-free dinner roll recipe. I have been using this recipe for years since I found the America’s Test Kitchen cookbooks. I used their recipe but over the years have modified it to my liking and creating a deliciously soft, roll uisng my bread flour!
My mom was famous on both sides of our family for her rolls. Every Christmas, Thanksgiving and Easter, she was in charge of making the dinner rolls, and she normally had to triple the batch. So much nostalgia is wrapped up in waking on those holiday mornings to the smell of yeasty dough wafting through the air and in the rhythmic way she would work the dough into rolls.
So the smell of them baking, the comforting rhythm of forming the dough, the lathering of butter atop the freshly baked rolls and the tender texture are all the essence I wanted when creating my own gluten-free version. Having Celiac Disease stole the joy of recreating these moments for myself, so in a wave of determination, I have worked to recreate this experience, for myself and others! And I am so proud of the result.
This gluten-free dinner roll recipe is easy to follow, made with wholesome ingredients and replicates a “real dinner roll”. With a few key players, AKA, secret ingredients, we create that beautiful texture produced by gluten, with all gluten-free ingredients, so you can enjoy the delicious yeasty goodness of a dinner roll at the holidays, just like everyone else!
So let’s get started!
Why You Will Love This Recipe:
- Made with simple ingredients!
- Made with my bread flour which is full of wholesome ingredients!
- The texture is like that of “regular” rolls
- Perfect for all those holiday gatherings!
- The recipe can easily be doubled
- Can be made ahead of time!
Ingredients:
- Active dry yeast: A leavening agent that helps dough rise, creating a light and fluffy texture. It needs to be activated in warm water before mixing with the other ingredients.
- Sugar: Provides food for the yeast to activate, speeding up the fermentation process, and adds a touch of sweetness to the rolls.
- Whole Milk: Adds moisture, richness, and flavor to the dough. It also helps with browning and contributes to a soft texture.
- Whole psyllium husk: A natural fiber that acts as a binding agent, helping gluten-free dough mimic the elasticity of gluten. It adds structure and moisture retention.
- Warm water: Used to activate the yeast and help dissolve ingredients, it also adds moisture to the dough.
- Gluten-free bread flour: A specially formulated flour blend, containing a blend of tapioca flour, millet flour, sorghum flour and teff flour, designed to replicate the structure and texture of wheat-based bread in gluten-free baking.
- Salt: Enhances the flavor of the rolls and helps balance the sweetness and richness of other ingredients.
- Baking powder: An additional leavening agent that helps the dough rise, especially useful in gluten-free recipes where extra lift is needed.
- Eggs: Provide structure, moisture, and richness to the dough. They also help bind the ingredients together and contribute to a tender crumb.
- Apple cider vinegar: Adds acidity to help activate the leavening agents (baking powder and yeast) and improve the texture and rise of the dough.
- Butter, softened: Adds richness, flavor, and tenderness to the rolls. Softened butter blends more easily into the dough for a smoother texture.
For the Egg Wash
- Egg: A medium sized egg, that is room temperature
- Butter: That has been melted and cooled
- Salt: I like to use pink Himalayan salt, but you could use Celtic sea salt or a flaky salt

Instructions:
- Warm the milk: In a small saucepan, gently warm the milk to 110°F (43°C), ensuring you don’t overheat it, as temperatures above 120°F may kill the yeast. Use a thermometer for accuracy. If the milk gets too hot, let it cool down to the correct temperature before proceeding.
- Dissolve sugar and activate yeast: Pour the warm milk into a bowl and stir in the sugar until fully dissolved. Sprinkle the active dry yeast over the surface of the milk, stir gently to combine, then cover the bowl with a clean kitchen towel. Let it sit for about 5 minutes until the mixture becomes frothy and bubbly, indicating that the yeast is activated. If no bubbles form, the yeast might be inactive, and you’ll need to start this step over with fresh yeast.
- Prepare psyllium husk gel: In a separate small bowl, mix the psyllium husk with the warm water (around 110°F). Stir to combine, and let this mixture sit for 5 minutes. It will thicken into a gel-like consistency, which helps mimic gluten in the dough, providing elasticity and structure. This is essential for the dough to hold together and rise properly in gluten-free baking.
- Mix dry ingredients: In the bowl of a stand mixer, combine the gluten-free bread flour, salt, and baking powder. Use the paddle attachment and mix on low speed to evenly distribute the dry ingredients. Mixing these dry components first ensures that the salt and leavening agents are evenly incorporated throughout the dough.
- Incorporate wet ingredients: After the psyllium husk gel has set and the yeast mixture is activated, start the stand mixer on low speed. Gradually add the psyllium gel into the dry ingredients, followed by pouring in the yeast mixture. Allow the liquids to be absorbed by the flour mixture. Next, add the egg whites, one at a time, and the apple cider vinegar. Increase the mixer speed slightly to ensure everything is well-blended.
- Add butter and mix the dough: With all the wet ingredients combined, add the softened butter to the dough mixture. Turn the mixer to medium-high speed and mix for about 5 minutes. This step is crucial for developing a smooth, cohesive dough. Even though gluten-free dough won’t have the same elasticity as traditional dough, this mixing process helps create a lighter and more uniform texture.
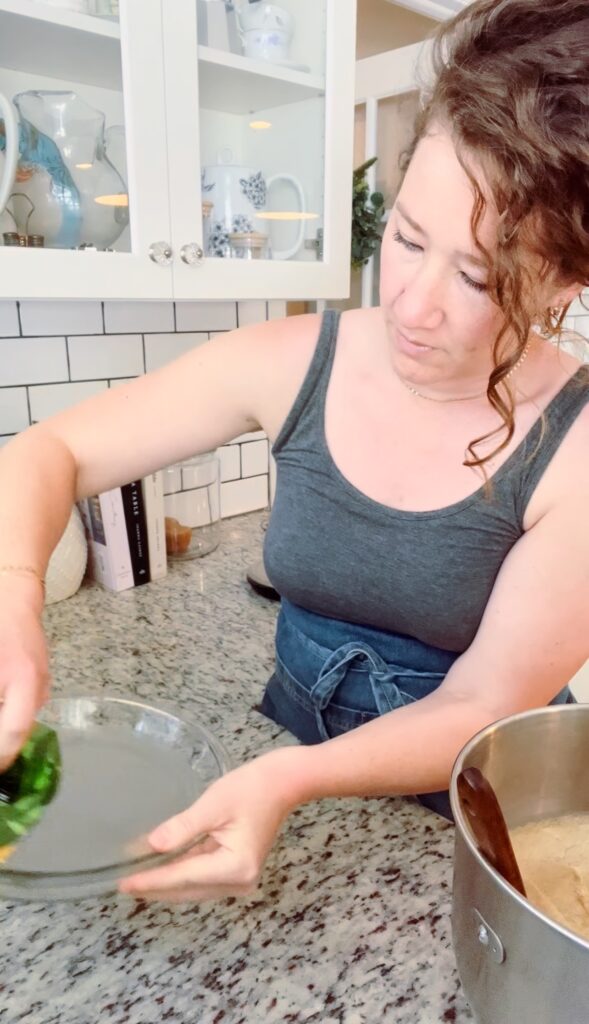
- Prepare the baking dish: While the dough is mixing, prepare your baking dish. For a single batch, use a 9″x9″ dish. If doubling the recipe, use a 9″x13″ dish. Rub softened butter generously onto the bottom and sides of the dish to prevent sticking and to give the rolls a golden, crispy crust on the outside.
- Shape the rolls: Use a large ice cream scoop or a 1/3 cup measuring cup to portion out equal amounts of dough, ensuring even-sized rolls that bake uniformly. Wet your hands with water or rub them with a little butter to prevent the dough from sticking – the dough will be sticky dough. Gently shape each portion by pinching up the four sides of the dough ball and rolling it into a smooth dome. Place the shaped rolls in the prepared baking dish, spacing them about ½ inch apart to give them room to rise.
- Let the rolls rise: Cover the dish with plastic wrap that has been lightly buttered on the inside to prevent it from sticking to the rolls as they rise. Place the dish in a warm place, a draft-free location to rise for about 1 hour. A good option is placing the dish inside an oven with the light turned on, as this provides a consistent, slightly warm environment. The rolls should roughly double in size.
- Preheat the oven: When there are about 10 minutes left for the rolls to finish rising, remove them from the oven (if that’s where they’re rising) and preheat the oven to 375°F (190°C). Make sure the oven is fully preheated before placing the rolls inside to ensure even baking.
- Bake the rolls: Prepare the eggs wash by whisking together the egg and salt. Using a brush, brush the egg wash atop the rolls. Bake the rolls in the preheated hot oven for 25 minutes, rotating the pan halfway through the baking time to ensure even browning. The tops should be golden brown, and the rolls should sound hollow when tapped gently. You can check for doneness by inserting an instant-read thermometer into one of the rolls—an internal temperature of 200°F (93°C) means they are fully baked.
- Finish with butter: Once baked, remove the rolls from the oven and let them cool for about 5 minutes. While still warm, rub the tops of the rolls with melted butter to enhance their flavor and give them a glossy finish.
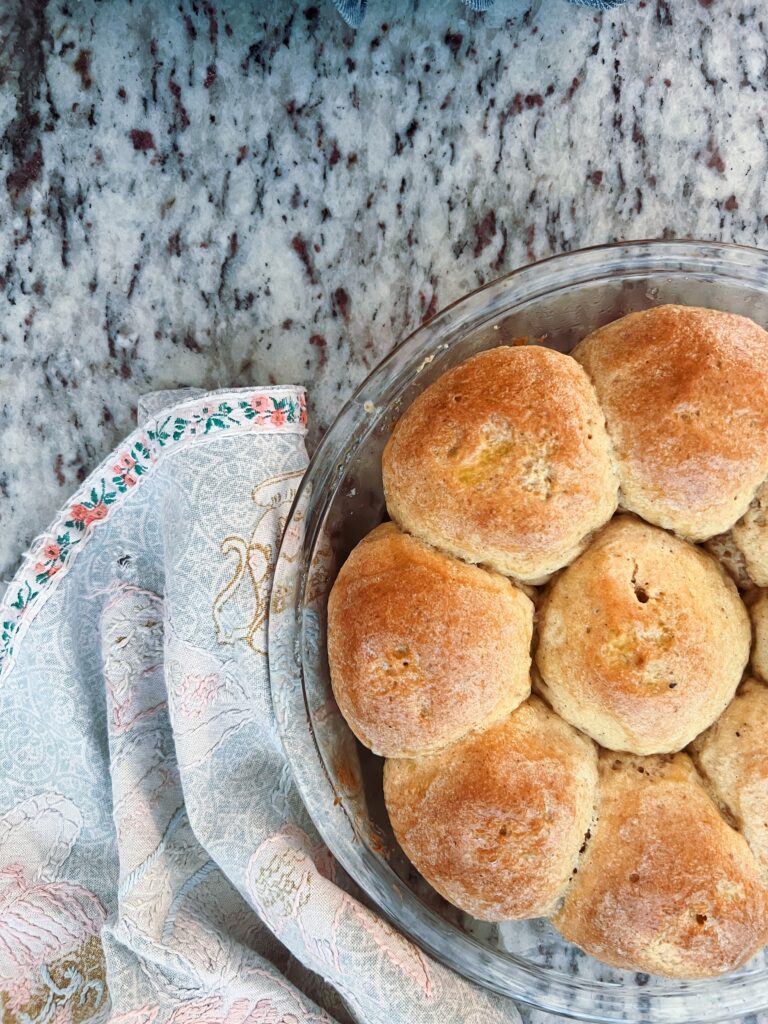
- Cooling: Let the rolls cool for at least 30 minutes before serving. This allows the texture to set and makes them easier to handle. Serve warm, and enjoy! These rolls will have a soft, pillowy texture inside and a golden, slightly crisp crust on the outside, perfect for a gluten-free dinner treat!

Perfect Pairings:
Gluten-free dinner rolls are versatile and pair well with a variety of dishes. Here are some perfect pairings to complement their texture and flavor:
1. Soups and Stews
- Creamy Tomato Soup: The soft texture of the rolls balances perfectly with the acidity and creaminess of tomato soup.
- Chicken Noodle Soup (Gluten-Free): Classic comfort food that pairs wonderfully with warm, fluffy rolls for dipping.
- Beef Stew: The rich, hearty flavors of beef stew with vegetables and gravy are perfect for soaking up with these rolls.
- Butternut Squash Soup: The sweetness of the soup pairs well with the soft, buttery texture of the rolls.
2. Salads
- Caesar Salad: The crisp romaine lettuce and tangy dressing go well with the rolls as a light contrast to the heartiness of the bread.
- Greek Salad: The briny flavors of feta, olives, and fresh veggies provide a nice contrast to the warm, soft rolls.
- Spinach and Goat Cheese Salad: A fresh, tangy salad with a bit of creaminess, perfect for a light meal or appetizer with the rolls.
3. Main Courses
- Roast Chicken: The buttery rolls are a great side for a juicy roast chicken, ideal for soaking up the savory juices.
- Grilled Steak or Pork Chops: Serve the rolls alongside a rich, hearty meat dish like steak or pork chops for a complete, balanced meal.
- Turkey Breast with Gravy: The rolls are perfect for mopping up gravy from a juicy turkey breast, making them ideal for holiday meals.
- Baked Salmon: The lightness of baked salmon pairs well with the soft, slightly buttery rolls for a well-rounded meal.
4. Dips and Spreads
- Herb Butter: Enhance the rolls by serving them with herb-infused butter (e.g., rosemary, thyme, or garlic butter).
- Garlic Hummus: A gluten-free dip like hummus works well with these rolls, offering a creamy, flavorful pairing.
- Baba Ganoush: This smoky eggplant spread provides a bold contrast to the mild flavor of the dinner rolls.
- Olive Tapenade: The salty, briny flavors of tapenade are excellent for spreading on gluten-free rolls as an appetizer or side.
5. Holiday Meals
- Thanksgiving Dinner: These rolls make a great side for classic holiday dishes like roast turkey, mashed potatoes, stuffing, and cranberry sauce.
- Christmas Ham: Pairing the rolls with a holiday ham, especially with a sweet glaze, creates a beautiful contrast of flavors.
- Easter Lamb Roast: Serve these rolls with roasted lamb, mint jelly, and spring vegetables for a festive holiday meal.
6. Breakfast or Brunch
- Scrambled Eggs and Bacon: Gluten-free rolls make a hearty and satisfying side for a breakfast of scrambled eggs and crispy bacon.
- Avocado and Poached Eggs: Top a halved dinner roll with mashed avocado and poached eggs for a gluten-free take on eggs Benedict.
- Sausage Gravy: Use the rolls instead of biscuits for a delicious gluten-free version of biscuits and gravy.
7. Cheese and Charcuterie
- Soft Cheeses: Rolls pair well with soft, creamy cheeses like brie or goat cheese, adding richness and smooth texture.
- Aged Cheddar: The sharpness of aged cheddar complements the mild flavor of the rolls, creating a tasty combination.
- Cured Meats: Rolls are a great base for charcuterie board meats like salami, prosciutto, and chorizo.
These pairings help balance the texture and mild flavor of gluten-free dinner rolls, making them a delicious accompaniment to both light and hearty dishes.
Tips and Tricks:
- For the best results, make sure all ingredients are room temperature.
- Butter your hands before working with the dough
- DO NOT overproof the dough
- Don’t skip the psyllium husk – it replicates the gluten in regular flour and is necessary for the structure and elasticity of the dough
- Use whole psyllium husks NOT psyllium husk powder
- You can substitute instant yeast for the active dry yeast, just skip the activating process and add in with the dry ingredients
- This recipe does not call for xanthan gum, as the psyllium husk provides enough structure
This recipe makes THE BEST gluten-free dinner rolls – no one will know they are gluten free! Check out the recipe card below.

Soft and Easy Gluten Free Dinner Rolls Recipe
Ingredients
- 2 1/2 tsp active dry yeast
- 1/8 cup sugar or honey
- 2/3 cup warm whole milk
- 2 tbsp psyllium husk whole
- 1/2 cup warm water
- 330 grams gluten-free bread flour
- 2 tsp baking powder
- 1 tsp xanthan gum
- 1 tsp salt
- 1 egg room temperature
- 1 tsp apple cider vinegar
- 2 tbsp butter softened
Egg Wash
- 1 medium egg
- 1/4 tsp salt
- 1/4 stick of butter melted
Instructions
- Warm the milk: In a small saucepan, gently warm the milk to 110°F (43°C), ensuring you don’t overheat it, as temperatures above 120°F may kill the yeast. Use a thermometer for accuracy. If the milk gets too hot, let it cool down to the correct temperature before proceeding.
- Dissolve sugar and activate yeast: Pour the warm milk into a bowl and stir in the sugar until fully dissolved. Sprinkle the active dry yeast over the surface of the milk, stir gently to combine, then cover the bowl with a clean kitchen towel. Let it sit for about 5 minutes until the mixture becomes frothy and bubbly, indicating that the yeast is activated. If no bubbles form, the yeast might be inactive, and you’ll need to start this step over with fresh yeast.
- Prepare psyllium husk gel: In a separate small bowl, mix the psyllium husk with the warm water (around 110°F). Stir to combine, and let this mixture sit for 5 minutes. It will thicken into a gel-like consistency, which helps mimic gluten in the dough, providing elasticity and structure. This is essential for the dough to hold together and rise properly in gluten-free baking.
- Mix dry ingredients: In the bowl of a stand mixer, combine the gluten-free bread flour, salt, xanthan gum and baking powder. Use the paddle attachment and mix on low speed to evenly distribute the dry ingredients. Mixing these dry components first ensures that the salt and leavening agents are evenly incorporated throughout the dough.
- Incorporate wet ingredients: After the psyllium husk gel has set and the yeast mixture is activated, start the stand mixer on low speed. Gradually add the psyllium gel into the dry ingredients, followed by pouring in the yeast mixture. Allow the liquids to be absorbed by the flour mixture. Next, add the egg, and the apple cider vinegar. Increase the mixer speed slightly to ensure everything is well-blended.
- Add butter and mix the dough: With all the wet ingredients combined, add the softened butter to the dough mixture. Turn the mixer to medium-high speed and mix for about 5 minutes. This step is crucial for developing a smooth, cohesive dough. Even though gluten-free dough won’t have the same elasticity as traditional dough, this mixing process helps create a lighter and more uniform texture.
- Prepare the baking dish: While the dough is mixing, prepare your baking dish. For a single batch, use a 9" pie pan or a 9"x9" dish. If doubling the recipe, use a 9"x13" dish. Rub softened butter generously onto the bottom and sides of the dish to prevent sticking and to give the rolls a golden, crispy crust on the outside.
- Shape the rolls: Use a large ice cream scoop or a 1/3 cup measuring cup to portion out equal amounts of dough, ensuring even-sized rolls that bake uniformly. Wet your hands with water or rub them with a little butter to prevent the dough from sticking – the dough will be sticky dough. Gently shape each portion by pinching up the four sides of the dough ball and rolling it into a smooth dome between your hands (not on the counter). Place the shaped rolls in the prepared baking dish, spacing them about ½ inch apart to give them room to rise.
- Let the rolls rise: Cover the dish with plastic wrap that has been lightly buttered on the inside to prevent it from sticking to the rolls as they rise. Place the dish in a warm place, a draft-free location to rise for about 45 minutes to 1 hour. A good option is placing the dish inside an oven with the light turned on, as this provides a consistent, slightly warm environment. The rolls should roughly double in size.
- Preheat the oven: When there are about 10 minutes left for the rolls to finish rising, remove them from the oven (if that’s where they’re rising) and preheat the oven to 375°F (190°C). Make sure the oven is fully preheated before placing the rolls inside to ensure even baking.
- Bake the rolls: Prepare the eggs wash by whisking together the egg and salt. Using a brush, brush the egg wash atop the rolls. Bake the rolls in the preheated hot oven for 25 minutes, rotating the pan halfway through the baking time to ensure even browning. The tops should be golden brown, and the rolls should sound hollow when tapped gently. You can check for doneness by inserting an instant-read thermometer into one of the rolls—an internal temperature of 200°F (93°C) means they are fully baked.
- Finish with butter: Once baked, remove the rolls from the oven and let them cool for about 5 minutes. While still warm, rub the tops of the rolls with melted butter to enhance their flavor and give them a glossy finish.
- Cooling: Let the rolls cool for at least 30 minutes before serving. This allows the texture to set and makes them easier to handle. Serve warm, and enjoy! These rolls will have a soft, pillowy texture inside and a golden, slightly crisp crust on the outside, perfect for a gluten-free dinner treat!