Light and Crispy, Oat Flour Gluten-Free Waffle Recipe
This recipe may contain affiliate links from which I earn a small commission.
Every Saturday morning (at least it felt like every Saturday morning) my mom would make Belgium Waffles, and she always used the recipe from the red and white checkered Southern Living Cookbook. They were perfectly tender with crispy edges and she loved to pair them with peanut butter and syrup, with a few pecans sprinkled over top. And sometimes, when we were out of syrup, she would make her infamous waffle/pancake frosting. A combination of powdered sugar, heavy cream, cinnamon and vanilla – pure perfection! And while the rest of the children of the world watched Saturday morning cartoons, I preferred hanging out with Julia Childs on OETA. HA!
I still prefer waffles over pancakes. I love making Belgium Waffles for my boys, working to create memories just like my mom did, and this recipe is a crowd favorite!

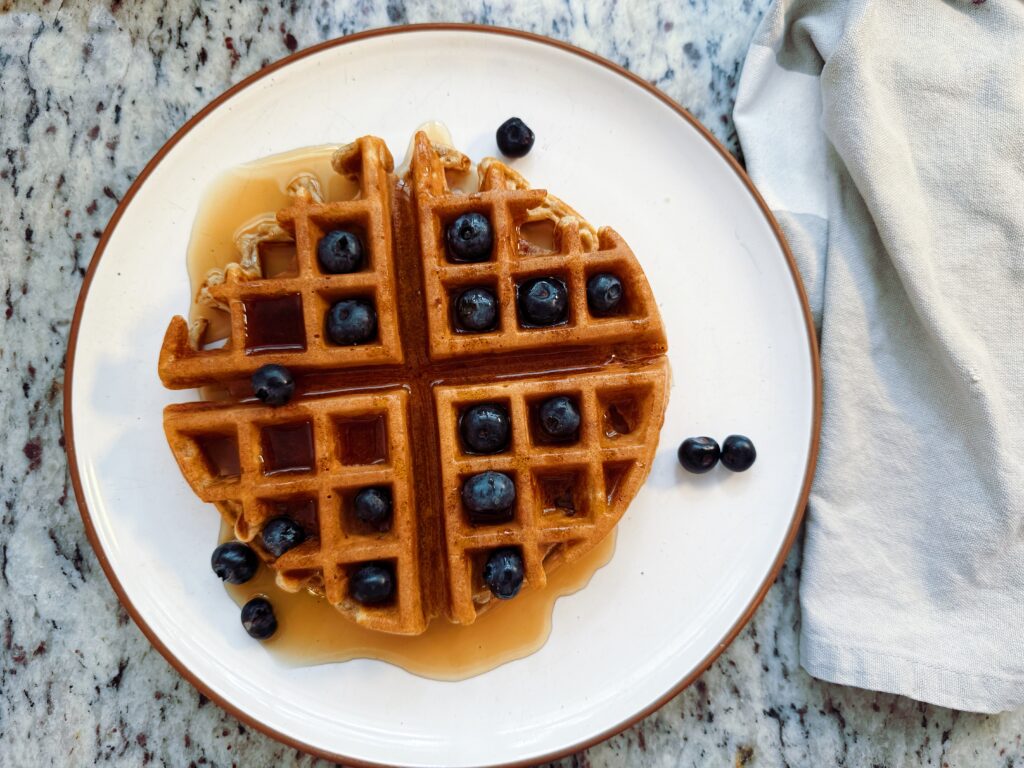
These gluten-free oat flour waffles are light, crisp, and incredibly easy to make—perfect for busy mornings or slow weekend brunches! Made with wholesome oat flour, tapioca starch, and naturally sweetened with just a touch of sugar, these waffles are both nourishing and satisfying. Folding in whipped egg whites gives them an extra-fluffy texture, while apple cider vinegar helps create the perfect rise. They’re completely gluten-free and easily dairy-free, making them a go-to for a variety of dietary needs. Whether you top them with fresh fruit, nut butter, or go savory with avocado and eggs, these waffles are endlessly versatile and freezer-friendly, too!
Why You’ll Love This Recipe:
- Naturally Gluten-Free & Wholesome
Made with oat flour and tapioca starch, these waffles are hearty, nutrient-rich, and completely gluten-free—perfect for those with dietary needs without sacrificing texture. - Crispy on the Outside, Fluffy on the Inside
Whipping and folding in the egg whites gives these waffles a light, airy interior with the perfect crisp golden edges. - Easy Recipe, Easy to Love
Simple ingredients and pantry-friendly, and the step-by-step process is approachable even for beginners. - Customizable for Sweet or Savory
These waffles are mildly sweet with a warm vanilla flavor, making them the perfect base for both fruity toppings or savory pairings like avocado and egg. - Dairy-Free Friendly
Just swap the milk for a plant-based alternative and you’ve got a delicious dairy-free waffle that still feels indulgent. - Freezer-Friendly for Busy Mornings
Make a big batch and freeze extras—they reheat beautifully for a quick, satisfying breakfast anytime. - Kid-Approved & Mom-Approved
Mild flavor, great texture, and endless topping possibilities make this a win for picky eaters and busy households alike.

Ingredients:
- 2 cups oat flour
(Use certified gluten-free oat flour for a safe gluten-free option. You can also make your own oat flour and grind certified gluten-free oats into a fine flour in a blender or food processor.) - 1/4 cup tapioca flour
(Adds lightness and crisp texture to the waffles, balancing the density of oat flour and soggy waffles.) - 2 tablespoons cane sugar
(Adds a touch of sweetness—can substitute coconut sugar or maple sugar if preferred.) - 2 teaspoons aluminum-free baking powder
(Provides lift for fluffy waffles. Make sure it’s fresh for best results.) - 1/2 teaspoon baking soda
(Works with the vinegar to help the waffles rise and brown.) - 1 teaspoon fine sea salt
(Balances the sweetness and enhances flavor.) - 1 3/4 cups whole milk
(You can substitute with dairy-free milk like almond, oat, or coconut milk if needed.) - 2 large eggs, separated
(Separate the yolks and whites; beat the whites to soft peaks and fold in at the end for extra fluffy waffles.) - 1/4 cup light neutral oil
(Such as avocado oil, light olive oil, or melted coconut oil. Adds moisture and crispiness.) - 2 teaspoons apple cider vinegar
(Reacts with the baking soda to create a light texture—don’t skip it!) - 2 teaspoons pure vanilla extract
(Adds warmth and depth of flavor—especially nice with maple syrup on top.)
Instructions:
- Mix the dry ingredients:
In a medium mixing bowl, whisk together the oat flour, tapioca flour, baking powder, baking soda, sugar, and salt until evenly combined. Make sure there are no lumps in the flour for a smooth batter. - Combine the wet ingredients:
In a separate small bowl, whisk together the milk, egg yolks, oil, apple cider vinegar, and vanilla extract until the mixture is smooth and well blended. - Bring it all together:
Pour the wet mixture into the dry ingredients and whisk gently until just combined. Do not overmix—some small lumps are okay. - Beat the egg whites:
In another clean bowl, use an electric hand mixer or immersion blender with a whisk attachment to beat the egg whites until they reach stiff peaks. This means the egg whites will stand up firmly when the whisk is lifted. - Fold in the egg whites:
Using a silicone spatula, gently fold the beaten egg whites into the waffle batter in two additions. Be careful not to deflate the egg whites too much—this step helps keep the waffles light and fluffy. - Batter Rest:
Allow the batter to rest for 10 minutes at room temperature. This gives the oat flour time to absorb the liquid, resulting in a thicker batter and better texture. - Preheat the waffle iron:
While the batter is resting, turn on your waffle maker and preheat it according to the manufacturer’s instructions. A well-preheated waffle maker helps achieve crispy, golden edges. - Cook the waffles:
Once preheated, lightly grease the waffle plates with oil or nonstick spray if needed. Use a 1/2 cup measuring cup to scoop the batter into the center of the waffle iron. Close the lid and cook according to your waffle maker’s instructions—typically 3 to 5 minutes—until the waffles are golden brown and crisp. - Serve and enjoy:
Remove the waffle carefully and place on a wire rack to keep it crisp while you cook the remaining waffles. Serve warm with maple syrup, fresh fruit, nut butter, or your favorite toppings.

Storage and Reheat Suggestions:
Short-Term Storage (1–2 Days)
Refrigerator:
- Let the waffles cool completely on a wire rack (this prevents sogginess).
- Store in an airtight container or zip-top freezer bag in the fridge for up to 2 days.
To Reheat:
- Toaster: Pop in the toaster for a crispy finish.
- Oven: Bake at 350°F for 5–7 minutes.
- Air fryer: 350°F for 3–5 minutes for a crisp edge.
Freezer Storage (Up to 3 Months)
To Freeze:
- Let waffles cool completely.
- Place in a single layer on a baking sheet and freeze for 1 hour (prevents sticking).
- Transfer to a freezer-safe bag or container. Label with date.
? Pro tip: Place parchment between waffles if stacking.
To Reheat from Frozen:
- Toaster: Straight from the freezer for 2–3 minutes.
- Oven: Bake at 375°F for 8–10 minutes until heated through and crisp.
- Air fryer: 375°F for 4–6 minutes.
Extra Tips:
- Do not microwave if you want crispy waffles—use toaster or oven instead.
- Great for meal prep: Make a double batch and freeze for busy mornings.

Perfect Pairings:
Classic Sweet Pairings
- Pure maple syrup – A timeless favorite that enhances the nutty oat flavor.
- Fresh berries – Blueberries, strawberries, or raspberries add a bright, juicy contrast.
- Whipped cream or coconut whipped topping – Light and creamy, especially paired with fruit.
- Nut butters – Drizzle almond butter or peanut butter for protein and richness.
- Sliced bananas & cinnamon – A warm, cozy combo that’s naturally sweet.
- Yogurt & honey – Greek or dairy-free yogurt adds creaminess, honey brings floral sweetness.
- Chocolate Chips — perfect for a special event like a birthday breakfast to jazz up this breakfast!
Savory Pairings
- Fried or poached eggs – Stack your waffles with eggs for a hearty, protein-packed breakfast.
- Avocado slices – Sprinkle with sea salt and chili flakes for a balanced, savory bite.
- Smoked salmon & herbed cream cheese – A brunch-worthy combination that’s both elegant and satisfying.
- Crispy bacon or breakfast sausage – Add on the side or crumble on top for a salty crunch.
Seasonal Pairings
- Apple compote with cinnamon and nutmeg – Especially cozy in the fall.
- Pumpkin butter & toasted pecans – Warm, spiced, and indulgent.
- Peach slices with a drizzle of vanilla yogurt – Perfect for summer mornings.
Beverage Pairings
- Hot coffee or cold brew – The toasty oat flavor is especially good with a dark roast.
- Chai tea or matcha latte – Warm spices or earthy matcha pair beautifully with the waffle’s vanilla notes.
- Fresh orange juice – A bright, refreshing contrast to warm waffles.
Make this Recipe Dairy Free:
Instead of whole milk:
Use 1 3/4 cups dairy-free milk such as:
- Unsweetened almond milk – light and neutral
- Oat milk – creamy and naturally sweet (pairs perfectly with oat flour)
- Coconut milk (carton, not canned) – for a richer texture
- Soy milk – great for a protein boost
? Make sure the milk is unsweetened and plain to control the flavor of your waffles.
Optional Tips for Best Dairy-Free Results:
- If using a thinner milk (like almond), a splash of full-fat canned coconut milk can add richness.
- Add an extra 1/2 teaspoon of vanilla for a more aromatic batter since you’re losing the richness of whole milk.
Dairy-Free Serving Ideas:
Top with:
- Coconut whipped cream
- Maple syrup
- Fresh fruit
- Nut or seed butters
- Dairy-free yogurt
Check out the recipe card below for this delicious gluten-free waffle recipe!

Light and Crispy, Oat Flour Gluten-Free Waffle Recipe
Ingredients
- 2 cups oat flour Use certified gluten-free oat flour for a safe gluten-free option. You can also make your own oat flour and grind certified gluten-free oats into a fine flour in a blender or food processor.
- 1/4 cup tapioca flour
- 2 tablespoons cane sugar
- 2 teaspoons aluminum-free baking powder
- 1/2 teaspoon baking soda
- 1 teaspoon fine sea salt
- 1 3/4 cups whole milk
- 2 large eggs separated
- 1/4 cup light neutral oil
- 2 teaspoons apple cider vinegar
- 2 teaspoons pure vanilla extract
Instructions
- In a medium mixing bowl, whisk together the oat flour, tapioca flour, baking powder, baking soda, sugar, and salt until evenly combined. Make sure there are no lumps in the flour for a smooth batter.
- In a separate small bowl, whisk together the milk, egg yolks, oil, apple cider vinegar, and vanilla extract until the mixture is smooth and well blended.
- Pour the wet mixture into the dry ingredients and whisk gently until just combined. Do not overmix—some small lumps are okay.
- In another clean bowl, use an electric hand mixer or immersion blender with a whisk attachment to beat the egg whites until they reach stiff peaks. This means the egg whites will stand up firmly when the whisk is lifted.
- Using a silicone spatula, gently fold the beaten egg whites into the waffle batter in two additions. Be careful not to deflate the egg whites too much—this step helps keep the waffles light and fluffy.
- Allow the batter to rest for 10 minutes at room temperature. This gives the oat flour time to absorb the liquid, resulting in a thicker batter and better texture.
- While the batter is resting, turn on your waffle maker and preheat it according to the manufacturer’s instructions. A well-preheated waffle maker helps achieve crispy, golden edges.
- Once preheated, lightly grease the waffle plates with oil or nonstick spray if needed. Use a 1/2 cup measuring cup to scoop the batter into the center of the waffle iron. Close the lid and cook according to your waffle maker’s instructions—typically 3 to 5 minutes—until the waffles are golden brown and crisp.
- Remove the waffle carefully and place on a wire rack to keep it crisp while you cook the remaining waffles. Serve warm with maple syrup, fresh fruit, nut butter, or your favorite toppings.