Homemade (& HealthiER) Butterfinger Bar Recipe
Honestly. I have never really loved the beloved favorite candy bar, Butterfingers. The texture of the inside is pretty cringy and the flavor seems fake. BUT I do love the idea of combining peanut butter and chocolate – always – and adding in a little crunch for texture sounds like a match made in heaven. So while this recipe is deemed a “copycat recipe” of the OG Butterfinger Bar, I think it’s a major upgrade! My boys rave about these healthy homemade butterfingers, and I love that I know exactly what is in them. They are the perfect after-dinner treat to curb those sweet cravings, while being a healthier option!
These Homemade Butterfingers are a nostalgic candy bar remake with a wholesome twist — gluten-free, naturally sweetened, and every bit as crunchy and chocolatey as the classic. Layers of creamy peanut butter and crispy corn flakes come together to create that signature Butterfinger texture, then each bar is dipped in smooth, rich chocolate for the ultimate treat. The best part? They’re made with simple pantry ingredients and no candy thermometer required. Keep a batch in the freezer or refrigerator for when you need a little something sweet – they’re guaranteed to satisfy every chocolate-peanut butter craving.
Why You Will Love This Recipe:
- Crunchy + creamy perfection: Each bite has that signature crisp, flaky crunch with a creamy peanut butter center — just like the candy bar, only better.
- Naturally gluten-free: Made with simple, gluten-free ingredients (just be sure your corn flakes are certified gluten-free!).
- Refined sugar free: Sweetened with pure maple syrup instead of corn syrup or processed sugar — a nostalgic treat made a little cleaner.
- Easy to make: No candy thermometer or complicated steps — just melt, mix, press, and dip.
- Freezer-friendly: Keep a batch on hand for when the craving hits; they stay perfectly crunchy even after freezing.
- Chocolate lover approved: The smooth, snappy chocolate shell brings it all together for a candy-bar-worthy bite.

Ingredients:
- 1 ¼ cups creamy peanut butter – Use a natural, unsweetened peanut butter (just peanuts and salt) for the best flavor and texture. Avoid “no-stir” types with added oils or sugars, as they can make the bars greasy.
- 1/3 cup pure maple syrup – Adds sweetness and a hint of caramel flavor; you can also use honey for a slightly firmer texture.
- 1 teaspoon pure vanilla extract – Enhances the candy’s warm, rich flavor.
- 1 teaspoon fine sea salt – Balances sweetness and deepens the peanut butter taste. If using unsalted peanut butter, keep the full teaspoon; if salted, reduce slightly.
- 3 cups corn flakes – Lightly crushed; these give the Butterfingers their signature crunchy, flaky texture. Gluten-free corn flakes can be used if needed.
- 3 tablespoons salted butter – Adds richness and helps bind the peanut butter mixture. You can use unsalted butter and a pinch more salt instead.
- 1 ½ cups semisweet chocolate chips – Melted for coating; dark chocolate also works beautifully if you prefer less sweetness.
- 1 tablespoon coconut oil – Helps create a smooth, glossy chocolate coating that sets nicely and snaps when chilled.

Instructions:
- Prepare the corn flakes:
In a large skillet or saucepan, melt the butter over medium heat. Once melted and slightly foamy, pour over the corn flakes and toss to coat evenly. Stir frequently for 2–3 minutes until the flakes are lightly toasted and fragrant. This step enhances their crunch and flavor. Remove from heat and let cool slightly. - Make the peanut butter base:
In a large mixing bowl, whisk together the peanut butter, maple syrup, vanilla, and salt until smooth and well combined. The mixture should be thick but pourable. - Combine and coat:
Add the buttered corn flakes to the peanut butter mixture. Using a spatula, gently fold until every piece is coated and the mixture looks evenly textured. Try not to crush the corn flakes too much—you want those flaky layers for a true Butterfinger crunch. - Press and set:
Line a 9×9-inch baking dish with a piece of parchment paper, leaving some overhang for easy removal. Pour the coated mixture into the pan and press it down firmly and evenly in a single layer with a spatula or the back of a measuring cup. Compacting it well will help the bars hold together once cut. - Freeze to firm up:
Place the dish in the freezer for about 1 hour, or until the mixture is solid enough to cut cleanly. - Prepare the chocolate coating:
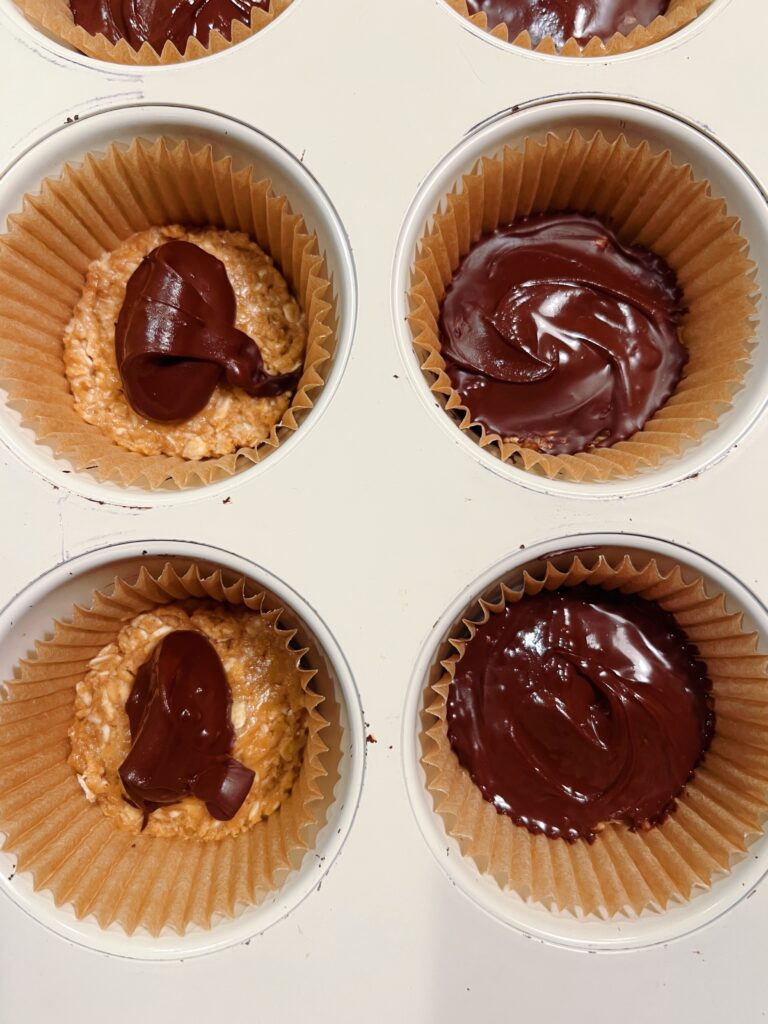
In a double boiler (or a heatproof bowl set over simmering water), melt the chocolate chips and coconut oil together. Stir frequently until the mixture is smooth and glossy. Remove from heat and let cool for 5 minutes so it slightly thickens. You could also melt chocolate in a microwave-safe bowl, stirring every 30 second intervals. - Cut and dip:
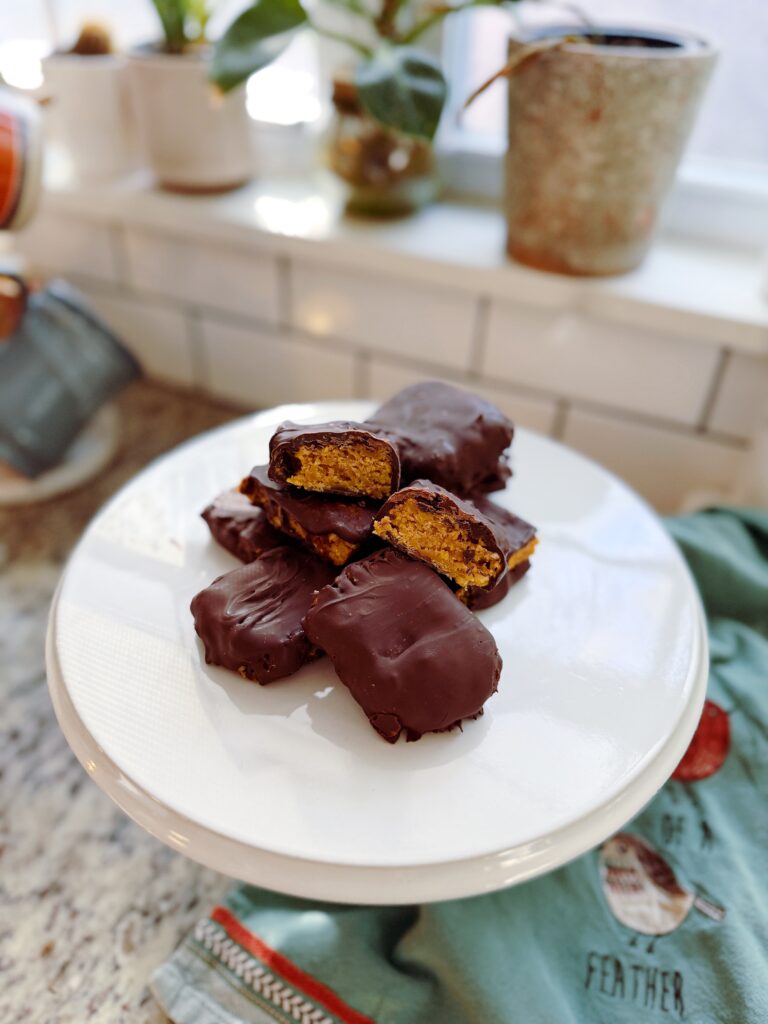
Remove the peanut butter mixture from the freezer and lift it out of the pan using the parchment paper. Using a sharp knife, cut into 10–12 rectangular bars (or smaller bite-size pieces, if preferred). Using a fork or dipping tool, coat each piece fully in the melted chocolate, allowing excess chocolate to drip off before placing them on a cooling rack or parchment-lined baking sheet. - Set and chill:
Once all the bars are coated, transfer them to the refrigerator for about 30 minutes (or the freezer for 15 minutes) until the chocolate is completely set and firm.

Storage Tips:
- Store in an airtight container in the refrigerator for up to 2 weeks or in the freezer for up to 3 months.
- For the best texture, let frozen bars sit at room temperature for 5–10 minutes before eating.
Helpful Tips
- Crush gently: Lightly crush the corn flakes before tossing them in butter — you want smaller pieces, but not crumbs. Those thin layers give the Butterfingers their signature crispy texture.
- Press firmly: When adding the peanut butter mixture to your pan, really pack it down. The tighter it’s pressed, the cleaner it’ll cut once frozen.
- Freeze before cutting: Don’t skip the freezing step! It makes slicing easier and helps the bars keep their shape when dipping in chocolate.
- Use a fork for dipping: Place each bar on a fork and gently tap it on the edge of the bowl to let excess chocolate drip off before transferring to parchment. This helps you get that smooth, even coating.
- Keep chocolate shiny: Add a touch of coconut oil to your melted chocolate for that glossy, snappy finish once chilled.
- Make it dairy-free: Swap the butter for vegan butter and use dairy-free chocolate chips — they taste just as delicious!
- Storage perfection: These bars keep beautifully in the freezer; just let them rest at room temperature for about 5–10 minutes before enjoying for the best crunch.
Variations:
- Almond Butter Crunch: Swap the peanut butter for creamy almond butter and add ½ teaspoon almond extract for a more delicate, nutty flavor.
- Dark Chocolate Espresso: Stir ½ teaspoon espresso powder into the melted chocolate for a grown-up twist that deepens the chocolate flavor.
- Sea Salt Butterfingers: After dipping, sprinkle a few flakes of sea salt over the wet chocolate for a salty-sweet finish that pops.
- Mini Bites: Instead of bars, press the mixture into a parchment-lined loaf pan, freeze, and cut into bite-sized squares before dipping — perfect for snacking or gifting.
- Nut-Free Option: Use sunflower seed butter or tahini instead of peanut butter for an allergy-friendly version with a unique twist.
- Peanut Butter Cup Style: Spoon a bit of melted chocolate into silicone muffin liners, add a layer of the peanut butter corn flake mixture, and top with more chocolate — a fun, no-cut version!
Nutrition Information
(Estimated per serving, based on 20 servings)
- Calories: 218
- Protein: 5 g
- Fat: 15 g
- Carbohydrates: 18 g
Check out the recipe card below to make soem butterfinger candy bars, made with simple ingredients so you can feel good about indulging!

Homemade (& HealthiER) Butterfinger Bar Recipe
Ingredients
- 1 ¼ cups creamy peanut butter Use a natural unsweetened peanut butter (just peanuts and salt) for the best flavor and texture.
- 1/3 cup pure maple syrup You can also use honey for a slightly firmer texture.
- 1 teaspoon pure vanilla extract
- 1 teaspoon fine sea salt
- 3 cups corn flakes Lightly crushed
- 3 tablespoons salted butter
- 1 ½ cups semisweet chocolate chips Dark chocolate also works beautifully if you prefer less sweetness.
- 1 tablespoon coconut oil
Instructions
- In a large skillet or saucepan, melt the butter over medium heat. Once melted and slightly foamy, pour over the corn flakes and toss to coat evenly. Stir frequently for 2–3 minutes until the flakes are lightly toasted and fragrant. This step enhances their crunch and flavor. Remove from heat and let cool slightly.
- In a large mixing bowl, whisk together the peanut butter, maple syrup, vanilla, and salt until smooth and well combined. The mixture should be thick but pourable.
- Add the buttered corn flakes to the peanut butter mixture. Using a spatula, gently fold until every piece is coated and the mixture looks evenly textured. Try not to crush the corn flakes too much—you want those flaky layers for a true Butterfinger crunch.
- Line a 9×9-inch baking dish with a piece of parchment paper, leaving some overhang for easy removal. Pour the coated mixture into the pan and press it down firmly and evenly in a single layer with a spatula or the back of a measuring cup. Compacting it well will help the bars hold together once cut.
- Place the dish in the freezer for about 1 hour, or until the mixture is solid enough to cut cleanly.
- In a double boiler (or a heatproof bowl set over simmering water), melt the chocolate chips and coconut oil together. Stir frequently until the mixture is smooth and glossy. Remove from heat and let cool for 5 minutes so it slightly thickens. You could also melt chocolate in a microwave-safe bowl, stirring every 30 second intervals.
- Remove the peanut butter mixture from the freezer and lift it out of the pan using the parchment paper. Using a sharp knife, cut into 20 rectangular bars (or larger pieces, if preferred). Using a fork or dipping tool, coat each piece fully in the melted chocolate, allowing excess chocolate to drip off before placing them on a cooling rack or parchment-lined baking sheet.
- Once all the bars are coated, transfer them to the refrigerator for about 30 minutes (or the freezer for 15 minutes) until the chocolate is completely set and firm.